Back in the Saddle is the second mission in Heart of the Swarm.
History[]
Get it Together[]
Nova Terra led a Terran Dominion force against the research facility. Battlecruisers attacked and several drop pods loaded with marines and ghosts invaded, Bravo Team landing very close to Sarah Kerrigan's position. Commander Jim Raynor arrived at the lab, but his fire was unable to dissuade Bravo from their goal. The squad cornered Kerrigan in her lab, but she destroyed the lab and all of her attackers with a psionic blast.
Afterward Kerrigan said the killing wouldn't stop until Emperor Arcturus Mengsk was dead. Raynor implored her to "get it together" and focus on escaping first. Nova realized that Bravo has ceased communications. Deducing correctly that Kerrigan had wiped them out, Nova dispatched the entire Dominion invasion force to sector six to wipe the former out. Raynor hands Kerrigan a rifle one of the ghosts had dropped, and the two share a kiss before moving out.[1]
The Mission[]
Kerrigan and Raynor fought their way past Dominion forces, occasionally encountering and getting assistance from Umojan infantry. During the attack zerg be studied in the lab escaped their pens and attacked the Dominion and Umojans indiscriminately. After fighting their way out of the lab, Kerrigan and Raynor take the tram to the shuttle bay to Raynor's special ops dropship. Crown Prince Valerian Mengsk had already escaped to board the Hyperion, but the shuttle bay was now occupied by a large Dominion mech, the Archangel. The Archangel destroyed the shuttle bay bridge, forcing Raynor to seek an alternate route while Kerrigan secured the area. Valerian promised Kerrigan to rescue Raynor, and she took the dropship to the Hyperion. However, the Hyperion was under attack by the Dominion Fleet, and Raynor was confronted by Nova.[2]
Choices[]
Kerrigan arrived on the Hyperion to find that Valerian failed to rescue Raynor, and Captain Matt Horner preparing to jump, their forces heavily outmatched. Kerrigan returned to the special ops dropship to find Raynor as the Hyperion and her allied ships warped away.[3]
Walkthrough[]
For the first part of the mission, Kerrigan will be accompanied by Raynor. The player cannot control Raynor directly, but he will automatically move to follow Kerrigan and will focus his attacks on whatever she is attacking. Throughout the level Umojan marines will assist the two. The first enemy the player encounters is a marauder, where Kerrigan will prompt the player to use kinetic blast to destroy it instantly, unlocking the ability for usage. After an encounter with a Dominion team, the player will find the first of numerous healing stations. Approaching it will fully heal Kerrigan and Raynor and restore Kerrigan's energy. Some of these stations recharge over time, shown by a holographic green display over them counting down. After this the player finds a Dominion squadron engaging the Umojans, and Kerrigan will prompt usage of crushing grip to stun them, allowing the ability to be used freely after. In the hallway beyond several droppods of Dominion troops will drop to ambush the player and the fleeing Umojans. At the end of the area the player will encounter a mass of zerglings and some roaches and fight them off with the aid of the Umojans. During the fight a side-passage opens and some Dominion forces also attack. When all enemies are defeated the player moves to the sublevel.
Throughout this part of the lab the player will encounter Dominion forces fighting off zerg. A security lockdown is in effect, and the player has a time limit to move through the areas before the exits seal. Fail to escape an area before the lockdown will result in mission failure. In the second lockdown area the player will encounter ultralisks held back by debris, it is advised to kill them before breaking down the debris. In the third lockdown area, the player will be given the option to unleash a mass of caged zerg or activate gas turrets to weaken a large number of Dominion forces in an adjacent room. The zerg will likely kill most of the Dominion forces, but must then be killed themselves, while the gas defenses kill all the biological troops but leave the mechanical forces at full health. After this hallway the player will reach the tram.
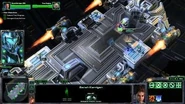
For this sequence, the player must defend the six engines of the tram from attacking wraiths and vikings, and medivacs dropping Dominion forces on the tram. The player is free to use Kerrigan's abilities liberally, as there are two health and energy recharge stations on the tram. Kinetic Blast is most useful, but against multiple enemies together Crushing Grip is also effective. If the Dominion destroys all six engines, the mission is lost. Eventually the tram arrives at the shuttle bay, where the Dominion have unleashed a heavy mech. After a short trek to the checkpoint, the player will engage the Archangel with Kerrigan, leaving Raynor behind.
The Archangel attacks in a pattern. First it will fire its main guns directly ahead, turning slowly, which can be avoided by staying to the side of it. Then it will fire missiles at Kerrigan, targeting crosshairs showing the point of impact, these can be avoided by moving to avoid them. After this the Archangel lifts off and strafe bombs the area, marked by arrow cursors. During this time a drop pod of Dominion forces lands to attack Kerrigan. The Archangel eventually lands on the opposite side of the area, unleashing a shockwave on impact, then unleashes a barrage of missiles marked by targeting cursors, alternating between the two sides of the area for its target. After it takes enough damage it will lift off and performing more strafing runs as more drop pods land. After this the Archangel lands in the middle of the area and turns to fire missile barrages at Kerrigan. When the Archangel is destroyed, the mission is won.
Videos[]
Cinematics[]
Choices[]
Achievements[]
| Points | |
| Criteria |
Complete the “Back in the Saddle” mission in the Heart of the Swarm campaign. |
| Edit | |
| Points | |
| Criteria |
Don’t take damage from the Archangel in the “Back in the Saddle” mission on Normal difficulty. |
| Notes | |
|
The achievement name is a reference to the 2009 video game Brütal Legend. | |
| Edit | |
| Points | |
| Criteria |
Prevent the Dominion from destroying a Tram Engine during the Tram Ride in the “Back in the Saddle” mission. |
| Edit | |
| Points | |
| Criteria |
Complete “Back in the Saddle” with more than 40 seconds on each lockdown on Hard difficulty. |
| Edit | |
| Points | |
| Criteria |
Complete the "Back in the Saddle" mission in less than 15 minutes on Normal difficulty. |
| Edit | |
Trivia[]

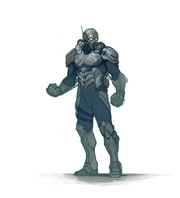
Concept art for a cinematic ghost model planned to appear in "Get it Together"
- In "Get it Together," the Dominion ghost uses a recolored spectre model. According to Phill Gonzales, a full ghost cinematic model was planned to be created for the scene, but the team had run out of time.[4]
- Dialogue between the two characters makes several references to their days in the Sons of Korhal:
- If the player does not move Kerrigan for one minute at the beginning of the mission, she will remark that Raynor is still a pig six years later, to which Raynor replies "old habits die hard."
- While traversing the sub-level, Raynor mentions that his hair is graying, causing Kerrigan to remark that her hair "has more zerg."
- Though Nova's dialogue with Raynor at the end of the mission changes based upon the player's decision in their most recently played Wings of Liberty campaign, her actions are not otherwise decision-based. If no save file with the choice is detected, the scene will default to Raynor helping Gabriel Tosh.
- A gunshot, can be heard in the ending scene after Raynor dares Nova to "take her shot" as it fades to black. The sound used is identical to that of Nova's sniper round ability from Wings of Liberty.
- Data in the Galaxy Map Editor indicates Raynor would have been able to acquire a plasma gun at some point in the mission's development.[5]
References[]
- ↑ Blizzard Entertainment. StarCraft II: Heart of the Swarm. (Activision Blizzard). PC. Cinematic: Get it Together (in English). 2013-03-12.
- ↑ Blizzard Entertainment. StarCraft II: Heart of the Swarm. (Activision Blizzard). PC. Mission: Heart of the Swarm, Back in the Saddle (in English). 2013-03-12.
- ↑ Blizzard Entertainment. StarCraft II: Heart of the Swarm. (Activision Blizzard). PC. Cinematic: Choices (in English). 2013-03-12.
- ↑ 2022-12-17, Phill Gonzales - Discord Questions. Imgur.com. Accessed on 2022-12-17
- ↑ Blizzard Entertainment. StarCraft II: Legacy of the Void Map Editor. (Activision Blizzard) (in English). November 10, 2015


