This article or section contains information from the optional Rebellion Missions in StarCraft II: Wings of Liberty.
|
- Captain Matt Horner(src)
The Great Train Robbery is a Wings of Liberty mission. It consists of a series of train robberies.
History[]
Background[]
Raynor's Raiders heard from their informants that the Terran Dominion was carrying out salvage operations on Tarsonis, transporting materials via a large number of supply trains with minimal security. If they intercepted the trains and liberated their contents before they could be shipped offworld, the Raiders could make a serious profit.
Through the informants, the Raiders found that the Dominion had restored power to the old rail network and found something very valuable which they were transporting to the processing station. Because they were scan-shielded, Captain Matt Horner suggested that they had to rob as many of them and hope "they get lucky".[1]
The Mission[]
The Raiders discovered abandoned Terran Confederacy diamondbacks not yet salvaged by the Dominion; Chief Engineer Rory Swann quickly reverse engineered the vehicles for immediate production.
The raids on the trains drew a graduated response from the Dominion. Trains gained increasingly heavy escorts and faster speeds. When the Raiders remained undeterred, the Dominion attempted to construct bunkers along the tracks and deployed a marauder kill-team.
The rebels withdrew after stopping the train carrying Adjutant 23-46.[1]
Aftermath[]
- Main article: campaign quotations
The adjutant refused to give out any useful information to Commander Jim Raynor. Horner suggested that Colonel Orlan at Deadman's Port could help in decryption. He also revealed, upon Raynor's teasing him on the incident, that he married Mira Han after winning a card game, though he hadn't been pleased that he had neglected to check what the "prize" was before joining the game.[2][3]
Walkthrough[]

StarCraft 2- Wings of Liberty - Mission (Optional) - The Great Train Robbery Walkthrough - Hard
Diamondbacks are an exceptionally useful unit in this mission. Their ability to fire on the move allows them to keep up with the train while laying on the hurt. The first train comes early in the mission, so it is advised to make one diamondback at the factory right away while using the marines present at the start of the mission to find the lost ones.

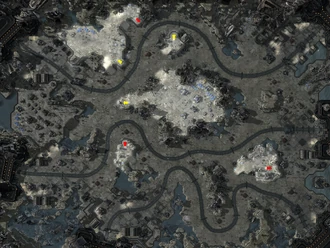
The location of the first three diamondbacks is revealed by Horner on the first seconds of the mission (highlighted with yellow on the image): there is one directly left of the player's starting location on the same high ground, another on a very small mesa to the north, and the other one on a larger hill to the northwest. The player will have to find the other three (highlighted with red on the image): one on the same large hill to the northwest but more to the north, another on a small mesa to the southwest, and the last one on a medium hill further to the southeast. All diamondbacks are unguarded on casual and on normal difficulties. On hard and brutal, the last two are protected by some Dominion troops: a couple of marines, with or without a firebat and a medic, depending on the level.
These six diamondbacks will help greatly this early in the mission and are easier to retrieve now than later when the Dominion is sending units out. There are numerous resource palettes around the map as well that the player can track down. Their speed and ability to attack on the move makes the diamondback well suited to scouting the area and retrieving the resources. Unless the player approaches their base the Dominion defenders are light. There is only one suitable expansion spot, to the northwest near where two of the diamondbacks rest, but it should not be needed. On casual and normal difficulty, both the initial base and the expansion have plenty of minerals; on hard and brutal, however, both locations have only a few minerals, making collecting the scrap from the trains more important.
The first train is unescorted and a small group of diamondbacks are necessary to bring it down. After that, the Dominion becomes worried and escorts begin to accompany the trains. Continually build up a force of diamondbacks, marauders (if available), marines and medics to counter the escorts, but do not forget about your base defenses. After two trains have been destroyed, bunkers loaded with marines and a marauder placed outside will be constructed along the tracks. Intercepting and destroying the SCVs that are sent from the bases will prevent the bunkers from being built. If the bunkers and troops are wiped out while there is no train, they're an easy kill, but when dealing with an attack force and/or escorts, they're a bit more of a threat. The sixth and seventh trains (assuming no train has escaped) to arrive will have no escorts, but will be quite a bit faster. On harder difficulties, they are escorted by hellions. Have the diamondbacks engage as quickly and as safely as possible while the rest of your forces are parked somewhere along the tracks. After that, the eighth and last train will be heavily escorted, but shouldn't be too much of a worry as long as a suitably powerful force has been built.
After several trains have been taken out, a tough squad (casual/normal/hard) or two (brutal) of a dozen or so enemy marauders will begin patrolling around the tracks. On easier difficulties, the groups consist solely of marauders, but on brutal they are also accompanied by medics. An achievement exists for taking this group out[1], but a large and diverse force is recommended, since the marauders can shred diamondbacks with ease. If the decision is made to hunt them with diamondbacks, have at least 16 and catch the marauders head-on in a narrow canyon. An alternative to this is to attack with cloaked spectres or ghosts, by completing the covert missions and the colonist missions. It is also handy if you have upgraded the spectres and ghosts in the armory on the Hyperion, with the cloaking ability. This allows the ghosts and spectres to permanently cloak.
This mission is made much easier if the Raiders have access to siege tanks. In siege mode, they do massive damage and can easily take down a train when massed. Siege tanks are also great for taking out escorts, bunkers, and the marauder forces that wander around the map.
Using massed spectres and ghosts also helps, as ten or more can bring down a train in ten seconds. Their cloaking abilities are also useful for destroying the bunkers and train escorts before you send in diamondbacks.
Contrary to what common sense might dictate, the train will not kill or damage any units that are on the tracks. However, if utilizing siege tanks, units will certainly be damaged if they cross paths with the trains at the wrong moment, so it's best to stay to the sides.
Research is acquired in this mission by finding defiler bone remains. There are three sets of remains, and they are not marked on the map before you find them. The locations are: northwest of the starting location along a cliff, close to one of the first three diamondbacks; directly south of the starting base, close to some tall wreckage; and west of the southernmost railway.
Achievements[]
| Points | |
| Criteria |
Complete all Mission Objectives |
| Edit | |
| Points | |
| Criteria |
Kill the Marauder Kill Team on Normal difficulty. |
| Edit | |
| Points | |
| Criteria |
Complete the mission without letting a Train pass by on Hard difficulty |
| Edit | |
| Points | |
| Criteria |
Complete "The Great Train Robbery" mission without building an SCV on Normal difficulty. |
| Edit | |
Notes[]
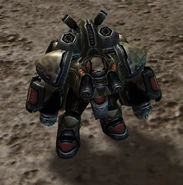
The kill-team presents unique skins for the medics and marauders only seen on this mission.
This map is available in Co-op Missions as the scenario Oblivion Express.[4]
See Also[]
References[]
- ↑ 1.0 1.1 1.2 Blizzard Entertainment. StarCraft II: Wings of Liberty. (Activision Blizzard). PC. Mission: Wings of Liberty, The Great Train Robbery (in English). 2010-07-27.
- ↑ Blizzard Entertainment. StarCraft II: Wings of Liberty. (Activision Blizzard). PC. Matt Horner (in English). 2010.
- ↑ Blizzard Entertainment. StarCraft II: Wings of Liberty. (Activision Blizzard). PC. Conversations after The Great Train Robbery (in English). 2010
- ↑ Blizzard Entertainment. StarCraft II: Legacy of the Void. (Activision Blizzard). PC. Mission: Co-op Missions, Oblivion Express (in English). 2015-11-17.


