Overview[]
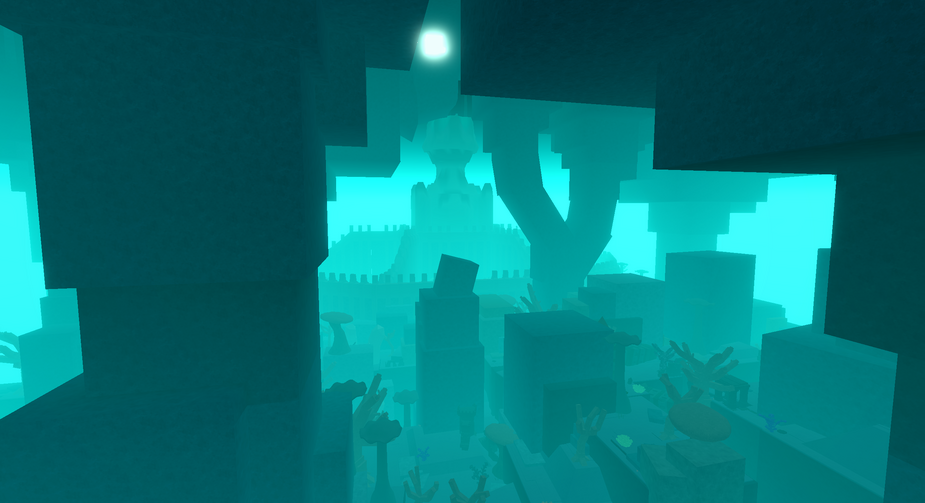
The First Layer of the Depths, also known as Scyphozia, is the one of the nine layers of The Depths, embodied with the long-lost sunken civilization of Celtor. Players are sent here after dying while having a stained health bar, being killed by the Primadon, being sucked in by a Whirlpool, dying with the Hollow or Vow of Thorns modifier, or dying in a Voidzone / the Voidsea.
Points of Interest[]
- The Chariot's Spire
- Ignition Union Deepdriller
- Marauder's Entrance
Escaping First Layer[]

Detailed map of the entire Depths First Layer
The main method to escape is by the Cathedral of Interstice, which houses the Trial in the center of the city. The Trial must be entered through the elevator.
The alternative method is limited to players with a Resonance, or Bell. Talk to Yun’Shul and select the wish "The trials ahead of me fill me with trepidation, I wish to escape this place." This method skips the trial altogether, but will only work in Layer 1. This outcome can be replicated with use of the Idol of Yun'Shul relic by selecting the wish "Release me from the depths". (The second method does not require a bell, nor does it require a wish from Yun'Shul. Take note this method cannot be used in combat: "The Idol won't respond to a panicked heart".)
Reaching the Elevator[]
Method 1: City Bells[]
There are 2 bells located in the District of Commerce (sloped gate). Once 2 bells are rung, a bell choir will be heard across Scyphozia, possibly signaling the salvation of the souls trapped within. The metal gate located in the District of Commerce will then open for 10 minutes.
Method 2: Sub-Elevator / Toll[]
A small sub-elevator is located within the city section entered through the flat gate. Nearby is a lever that can be interacted with. For a fee of 25 notes, the sub-elevator will rise to the main elevator. If you do not wish to pay the fee, you can climb up the elevator shaft with mobility mantras or enough agility.
Warning: Directly next to this elevator is a set Nautilodaunt spawn, a mob that can easily wipe players who are unprepared to fight it. Take caution when nearing the sub-elevator. (Note that due to its popularity, however, it's more likely that it will not be present, and the Nautilodaunt has a long spawn timer anyways. If it is present, you can usually outrun in by getting on top of the elevator and jumping up that way, but if you are inexperienced it is best to simply leave.)
Method 3: Climbing Walls[]
Although directly climbing the City Walls with barrels atop roofs was once a popular strategy, its effectiveness has been reduced. The white city columns are no longer possible to climb. It is still possible to land directly atop the walls, however, as listed below.
Locate a building near the walls of the city, and create an immense tower of barrels (15-20). Alternatively, utilize vertical movement mantras, such as Flame Leap. Once atop the wall, you may enter the elevator room by walking to the center of the city.
This method is no longer the recommended strategy for reaching the elevator.
Method 4: Gliding[]
Find a rock, cliff, or another high place, and use a glider to reach the top of the wall. Be careful with this method, as Gigameds (Jellyfish) can jump extremely high, and can hit you out of glide. This may send you to Layer 2, or lead to death from fall damage.
First Layer: The Trial[]
- “ As a quasi-metaphysical realm, the Depths is believed to exert a pulling force on one's soul, based on one's proximity to the deep. So to say, once one is in the Depths, their soul experiences a constant downward pull. If one tries to leave the Depths by simply physically exiting it upwards, without the aid of ritual or other preparation, they will cross what is known as 'the boundary' - a limit beyond which a soul cannot continue physically travelling in your body. Ergo, the body continues upwards, while the soul is pulled downwards, until the two are wholly separated, and the person dies. ”
The Voices of the Depths have you prove your worth by putting forth a difficult fight, dependent on your current strength. If there are multiple players in the trial room, the enemy type encountered in the trial is decided by the highest power present. Every other player WILL STILL contribute to the enemy count (Ex. one power 20 player and two power 13 players will spawn three Enforcers).
Once the trial is completed, players are also granted total immunity to damage until they are teleported out of the Depths. Note that escaping will always cleanse the health bar.
Note:[]
Your Difficulty Score is calculated by "(Power x 3) + Drowns". This dictates the type of enemy you will be faced with when initiating the Trial. Total times drowned can be viewed at a campfire (in the summary page); the number increases each time you are sent to the Depths through death (not whirlpools or Deepbound's "Call of the Deep").
Some things add extra Difficulty Score:
- The echo mod Vow Of Thorn adds 30 Difficulty Score
- The Shrine of Courage adds 50 Difficulty Score
- The Deepbound Origin has an innate 50 Difficulty Score induced by Power (they count as being at least power 17). They normally gain Difficulty Score when above that.
| Difficulty Score | Enemy(ies) |
|---|---|
| 1-14 | Nothing (you are sent up without a fight) |
| 15-19 | Mudskipper Knight |
| 20-29 | Lesser Angel |
| 30-49 | Megalodaunt (which can be Corrupted) |
| 50-79 | Enforcer (Low chance to be replaced with a Nautilodaunt) |
| 80+ | 2 waves of enemies will spawn, each consisting of one Monster: Bone Keeper, King Thresher, or Fury Nautilodaunt (All of these enemies can spawn in Corrupted) |
| 5-8 players, one having a Difficulty Score of 60+ | Heart of Enmity (Starting from the 9th player, they will get kicked out of the fight) |
- Some monster in Trials have a possibility of being corrupted.
- Curiously, any monster can be corrupted if spawned in the trial, including enemies that can otherwise never be: Bounders, Golems, Brainsuckers, etc. When this occurs, however, their AI will (probably) break. Exemplified in this video: https://www.youtube.com/watch?v=0scBW8J3MpQ
- Any monster (excluding Mudskipper Knights and Lesser Angels) can spawn Attuned.
- Furthermore, in rare (and unlucky) cases, monsters can simultaneously spawn Attuned AND Corrupted.
- This corrupted factor will always apply if you or anyone else has the Echo modifier "Deep Champion", meaning you'll face a corrupted version of a trial monster before escaping the Depths.
- It is highly recommended to be wary of players in the cathedral's elevator.
- In the case you are suspicious of a player once the elevator has reached the top, you are technically not combat tagged, meaning you can safely leave the server before or during the voices' conversation. Note that leaving the server in the trial room will always teleport you to outside of the gate. In an unlikely but possible scenario, if the player has Blindseer or Rhythm they can use it to detect any invisible players.
- Also note that all barrels despawn prior to reaching the top. Any barrel that remains is a player using Disguise.
- This corrupted factor will always apply if you or anyone else has the Echo modifier "Deep Champion", meaning you'll face a corrupted version of a trial monster before escaping the Depths.
- Once the monster spawns, you will automatically be locked in combat. The combat tag in the Depths trial takes 10 minutes to despawn.
- Regardless, low-level trial mobs will allow you to outwait the combat tag by simply climbing on top of the chains and waiting. Mobs with long-range attacks or pull moves, such as angels, megalodaunts,
and enforcers, do not allow this. At the top of the chain, players cannot be pulled by an enforcer unless they fall. - As of late, the combat tag is not a boss tag. As such, player can close the game the instant the trial begins with zero repercussions (so long as their health is above 60%).
- Do not rely on this. It is likely unintended, and will be patched soon.
- Regardless, low-level trial mobs will allow you to outwait the combat tag by simply climbing on top of the chains and waiting. Mobs with long-range attacks or pull moves, such as angels, megalodaunts,
- If 2 or more players enter the Trial, all will fight the monster of the highest power. It will also look to see if anyone has the Vow of Thorns modifier on and apply it.
- Example: Two power 16 players will spawn two enforcers. one power 7 and one power 16 will have to fight two enforcers.
- Example: One player is power 10 and another is anywhere below power 10. Regardless of the second player's power, 2 megalodaunts will still spawn.
- Example: One power 1 with Vow of Thorns and one power 20 will spawn wave defense.
- Those with the Deepbound origin must always fight an Enforcer or Nautilodaunt, regardless of power.
- Curiously, a Power 1 Deepbound and Power 20 Non-Deepbound will spawn just one Enforcer.
Farming in First Layer[]
Scyphozia, being a naturally hostile location, is intentionally difficult to survive in, from perpetual monster spawnage to the fast and easy to forget sanity loss. However, the benefits of EXP Gain and loot drops can far outweigh the dangers for players who are willing to risk wiping in seconds. Listed below are some things you may want to consider before heading down. These things will aid in your sustained survival in one of the most treacherous areas in Deepwoken.
Talents & Equipment[]
- Carnivore, the Talent that makes up part of the Apex Predator Talent tree, is important if you plan to stay in The Depths in the long term. It removes the ability to consume plants (mutual exclusive with Vegetarian flaw), but in exchange, gripping Players, NPCs, AND monsters will replenish your HP, Hunger, and Thirst meters. With most food in the Depths being poisonous, the steady supply of blue Jellyfish is more than enough to keep you satiated. Requires 5 Willpower and 5 Strength.
- Conquer Your Fears, a Talent that makes up part of the Mental Fortress Talent tree, is a good way to combat the slow drain of Sanity that being within purgatory imposes. Though all Talents in the Mental Fortress Talent tree are beneficial inside The Depths, Conquer Your Fears is a surefire guarantee as, like Carnivore, it replenishes your Sanity upon killing monsters of the Deep. Requires 10 Willpower.
- Underdog allows more damage to larger foes. Good for fighting Sharkos, Lionfish and Crabs. Requires 40 Willpower.
- Blindseer Oath, an Oath obtainable through 40 Willpower and all 3 Mental Fortress cards, will allow passive survival in Layer One for over an hour due to the base sanity stat.
- %Damage vs Monsters (DvM) and %Monster Armor equipment with stat modifiers usually has a form of DvM and/or Monster Armor, which is useful.
Tips and Tricks[]
Information to keep in mind.
- Insanity will be your artificial timer for how long you can stay in Layer One. You start with 80 max sanity, and every point allows 30 more seconds before losing it. You can last approximately 40 minutes before your character gains maximum insanity. Although impossible to die to natural insanity in the depths, insanity can severely affect your combat abilities and having max insanity will make you die instantly when downed or below 10% health. Willpower, Talents, and equipment grant extra sanity.
- Consider utilizing Flamecharm to cast Graceful Flame with Undying Flame. The Talent removes any risk of going insane in the First Layer as sitting by a campfire restores sanity. Do note that Lockers in the Diver Camp and Castle Light do not restore sanity.
- Blindseer doubles or even triples the time you can stay in the Depths.
- Deepbound players can rest in Castle Light at the campfire to restore sanity and craft food. Do note that only Deepbound players can use the campfire.
- Corrupted Monsters are the juiciest part of Depths Farming. Identified by the purple haze/mist surrounding them, these mobs act like their regular counterparts but have 2.5x HP and 1.5x damage. These grant Chests with even better loot.
- On opposite corners of the map, two Black Bells can be found. They increase the odds of Corrupted Monsters appearing. [Citation needed]
- The inability to create campfires means that healing methods are limited. Besides killing monsters, especially jellyfish, commonly nicknamed "Health Packs" (unless you engaged combat with a player), and Graceful Flame (with the Talent undying flame), you might want to consider bringing healing potions.
- Heartening Salves are also a great idea to bring because of their special ability to get rid of insanity. They are a part of Alchemy and cost three Bluecaps to make the maximum effective version of the potion.
- Warrior's Respite is an extremely useful Talent in The Depths, allowing you to heal without special abilities. Another good card is Conditioned Runner, which allows you to heal while running.
- Animal King/Mute will be your best friend if you desire to farm in the Depths. However, due to being a Regalia, your character can only be born with it under certain conditions that are still unknown. The reason why Animal King will be very helpful in the Depths is because most, if not, all monsters in the Depths will be Neutral to you on sight. This will make farming mobs a lot easier, as they will also lose aggro to you if you do not attack them after 15 seconds, similar to guards in Etris or Isle of Vigils. Thanks to this, The Depths may be your best friend when you are in a pinch such as if you are attacked by a group of high levels, any group of mobs can aid your escape. Keep in mind that hitting a monster even once will make them attack you.
- If you have the Deepbound origin, remember to regularly visit Castle Light, as it will rapidly restore your sanity.
- Seaweed is currently the only natural source of food for vegetarians in the Depths, although it will drain a sliver of your thirst.
Quests[]
Finding Morning[]
- An NPC named Raphael asks to find someone on the surface world named "Morning" and tell them that the preparations are almost complete. When questioned more about how to find "Morning", he replies with "How is a 150–200-year-old dead person supposed to remember what someone alive looks like?".
- (As of now the quest is not done, which was started by Arch_Mage. Morning doesn't exist in-game at the moment and will stay so until the quest is finished by developers.)
Joining The Divers[]
- Akira, a Black Diver, can be found as an Encounter outside the City of the Drowned. He sits down with a Frostdraw Wisp, reading a book- against a group of Ignition Union goons.
- You can confront Akira after he kills the Ignition Union goons, proposing 2 dialogue options.
- 1. "Wait, I'm not with them." - This option leads to further dialogue with no consequence. Finishing the dialogue makes Akira appear at Castle Light, allowing you to join the Divers and unlock the origin Deepbound.
- 2. "Don't mess with the Ignition Union, snake-eyed bookworm trash," - Charisma check (75). Failing this check leads to the same fate as the Ignition Union group. Success causes him to leave, although this has no result other than that.
- You can confront Akira after he kills the Ignition Union goons, proposing 2 dialogue options.
Oath: Visionshaper[]
Deep southeast in the Depths, you can find a secret room located near the Deep Widow. Here, there is a man named Surge who can teach you illusion magic (the Visionshaper Oath) in exchange for Void Feathers.
Once you have spoken with Surge, the Nestmind - a being that exists within a deeper layer of The Depths - will open their realm to you. It offers scraps of knowledge on about the Deep Owls and the Depths.
- Void Feathers drop from corrupted Deep Owls in The Depths, although they can also rarely drop from the normal variants as well.
- This quest is very tedious and dangerous, so it is recommended you come with a group or to otherwise be prepared.
Potential Enemies[]
Loot Table[]
Below is a list of potential items that can spawn in chests in Scyphozia. Scyphozia is the best place in the game for loot and corrupted monsters give better loot than normal monsters.
| Outfit Schematics | Equipment | Weapons | Miscellaneous |
|---|---|---|---|
Tips from Experienced Depths Divers[]
- Adaptation to The Depths is mandatory and inevitable in Deepwoken. If misfortune on the surface proves unavoidable, then your ability to strive in The Depths has to be sufficient. Learning the ways of vanquishing each and every of the Depths' monsters, learning the layout of the terrain in general, learning how and when to avoid unwinnable conflicts, succeeding in the Trials 100% of the time and more are part of your adaptation to the Depths. It is one of the most important parts of Deepwoken and can be extremely rewarding so long as you can deal with the risks involved.
- FIGHT OR FLIGHT? That is the question and most of the time, the answer is flight. Do not over-estimate yourself or under-estimate the mobs that spawn in the depths. Mobs spawn very often and very widespread down in the Depths, so don't be surprised if you're fighting one mob and another one spawns nearby. All of these mobs are passive towards each other and have a common target - you.
- The Trial of One provides an effective guide to some of the monsters that permeate the depths (the Megalodaunt, Thresher, and the Enforcer), increasing your survival rate once you can conquer them.
- If you see a group of high-level people, log to the main menu. Your chances of not combat logging are better than your chances of not getting gripped in The Depths. There is also certain quests such as obtaining Contractor that require the player to grip people in The Depths, which gives them an incentive to ambush what may seem like jaywalking freshies.
- The same goes if there many people of the same guild flooding the server. It's not worth risking your chances to be caught in the crossfire of a depths gank, or a depths cleanse (killing anything that moves in the depths).
- Certain guilds are known for purposefully wiping players in the depths, such as the Anguish, Attuned, Toilet Cloggers, Akers, Sakura, Amongst Us, Vino, Akai, Sweeperstop, Golden Rats, Phoenix Warriors, Retsu and Gothic, The Gale Specter Path, The Cleansed, Anything for Klaris.
- Do note this information is mercurial and may quickly become outdated. Regardless, it's advised to switch servers if you see a player from these guilds, as they are still (probably) on high alert.
- Certain guilds are known for purposefully wiping players in the depths, such as the Anguish, Attuned, Toilet Cloggers, Akers, Sakura, Amongst Us, Vino, Akai, Sweeperstop, Golden Rats, Phoenix Warriors, Retsu and Gothic, The Gale Specter Path, The Cleansed, Anything for Klaris.
- Angels are very easily avoidable through scaling buildings and fleeing on high ground. Hiding in the top of buildings until your combat tag goes away can be very easy to do in most situations. Fighting is not a bad alternative however, as they do not have any game breaking moves to destroy you with. Simply trade parries with them and follow your normal combat procedure until they are knocked, and try guard-breaking them every once in a while, as their posture is not remarkably big.
- Having a sense of direction and environmental awareness is vital for your survivability and safety. Maximize the usage of your map (keybind 'M') if your new to the depths. Falling into the void while your above 60% Health (only applies for characters power 3+, as lower power leveled characters will get wiped) will send you to the Ethironal Shrine Outskirts in Layer 2, Floor one. In order to escape the floor unprepared, (Light Hook is not available) you will have to activate the Deepdriller or kill Chaser.
- Ringing the bells (not corrupted bells) in the The City of the Drowned will restore some HP and sanity, equivalent to that of knocking an NPC or monster around your power.
- Diver camps have lockers that act as "campfires", although you can't heal nor use them to make food. there is a heater, however, which can heal you and can be used to make food. Do note the heater is only usable by those with the Deepbound origin.
- If you find yourself in the Depths with very little health, there are some options for you. These options include using the Warrior's Respite Talent, killing a low-level mob (i.e a Jellyfish or a Mudskipper) for healthpack, or a friend thats conveniently in the Depths to place down a Graceful Flame for you.
- Castle Light contains a blacksmith in which you can repair your outfit if you have good or neutral reputation with the Divers.
- Bringing high mobility mantras such as Strong Leap, Flame Leap, or Adrenaline Surge will be helpful in fleeing any unwanted fights and navigate the treacherous terrain.
- AVOID fighting a Megalodaunt near pitfalls - getting kicked by a Megalodaunt will likely fling you off the edge, which may lead you to an unexpected wipe, or Layer 2 visit. If you do happen to fight one near a pitfall/cliff, and there is no chance of regaining flat ground with no risks of pitfalls, face your character towards the edge of the cliff. The Megalodaunt will always attack facing the characters front side.
- AVOID the Nautilodaunt if you're unexperienced with it. The Nautilodaunt will make loud grumbling noises when in it's idle spawn state. Once spotted, it is extremely difficult to escape. Unlike any normal monster, they can spot you at unfairly long distances, even when you're not even in their line of sight. They're very tough but also highly intelligent in close combat, being able to skillfully parry, block and vent attacks and criticals which leaves you having a good chance of being wiped by them. If you are caught by a Nautilodaunt, try scaling the tallest building you can find in the city, and then log after your combat tag disappears. Because if you didn't know already, they will never stop chasing you.
- Avoid any monsters you have little to no experience with, especially Deep Owls, King Threshers and Nautilodaunts, which have comparatively high mobility and intelligence. Additionally, don't take fights you're uncertain you can win. If you are not prepared to wipe, this is not the place to learn. For many mobs, you can fight them somewhere else with less risk (Except for the Nautilodaunts since they spawn in the Depths, but the Diluvian Mechanism is a very unorthodox but available way to train).
- If you see your character is becoming insane, such as shivering or scratching, it is best to leave the Depths as quickly as possible. If you use a Glider at this stage of insanity, you will fall off the Glider.
- If you are experiencing severe lag on a particular server, consider switching to another one. A single lag spike can result in a wipe if not careful.
- It is advised to carry a Repair Kit in case your armor bar is gone. Thresher Scales cannot be used without a campfire, but can be used with graceful flame. Thresher scales does not work with the Diver lockers.
- If within the vicinity of Castle Light, it's not a bad idea to bring a mob that you're fighting to them. The Diver NPCS are rather competent and tanky, shifting the monster's aggro towards them, effectively protecting you.
- If you plan on using Flame Ballista in the trial to get a hit, start conjuring it right when the voice of Odium says "Their" in "Just be quick about it will you? Their stench is already nauseating." Make sure to point at the right spot, as it will most likely not auto-target. Do know where the monster will spawn.
- If Finnegan The Lost or The Fisherman randomly spawn upon you, and you are not powerful enough to defeat them, run. It is not worth risking it against an enemy that has too much HP for you to properly deal with, and they dont have a good arsenal of player-catching mantras with them - just try not to get stuck with the Fisherman's chains, or get caught by Finnegan's Metal Ball.
- Stay aware of your surroundings. With the recent job updates, the presence of more players increases the likelihood of monster spawns, which could make your situation worse if you're fighting a monster or players. While it is good having players in a server which could potentially help you in sticky situations, its not always a guarantee that they are friendly or they are there within your vicinity.
- If you are unfamiliar with monsters and the Depths in general, always try bringing another experienced and competent friend with you, as it will make learning the harrowing tribulations of the Depths slightly more easing for you.
- If you are a new player, it is heavily advised to log if you hear cracking and rumbling randomly inside the Depths. This is the 'Collapse' which spawns in a horde of dangerous and threatening monsters in 2-4 rocks that fall from the depths' ceiling.
Gallery[]
Trivia[]
- Scyphozia is a corruption of the word Scyphozoa, which is the marine class the true jellyfish are in. Meanwhile, Scyphozia's main enemies are Gigameds.
- The ability for monsters to spawn corrupted appears to be intrinsic to the First Layer rather than the monsters themselves, as monsters from the Second Layer can be corrupted if spawned in the First Layer.
- Resonances can resurrect a player one time when they are knocked in the Depths, once progress is sufficient (usually about power 16 by only staying in the Depths and killing mobs exclusively in the Depths.)
- You can use 5 Umbral Obsidians to gain Shadowcast by talking to Nostor found in Layer One. This permanently unlocks Shadowcast for the account.
- Staying in The Depths for prolonged periods of time (from 20 minutes onwards with 0 Willpower) will drain your Sanity, causing your vision to become blurred and eventually causing you to slowly lose health via scratching yourself. You can be executed by insanity if you are low enough, but you can stay alive as long as you keep your health up. Max insanity will instantly kill you if you are using the Curse of the No-Life King enchant.
- The instruments in the combat theme heard in this location are reminiscent of "void," a theme within the Terraria Calamity Mod that is heard within the 4th layer of the similarly dangerous Abyss biome.
- If you are facing against a player/mob in The Depths while you have your back facing the void, it is essentially guaranteed that you will most likely be launched into the void if you are not careful. Many players, experienced or not, have fallen victim or will fall victim to the void at least once in their gameplay.
- According to the "Munet Journal, XIV", It canonically takes 2 weeks for a being to escape the depths.
- The Boulder Event in the Depths can spawn most monsters including 2 Threshers, a Megalodaunt, an Alpha Megalodaunt, a King Thresher, and a Nautilodaunt. Killing all of the Depths monsters it has spawned will reward you with multiple hellmode chests filled with highly valuable loot. The more meteors that fall, the more chests with more valuable loot there will be depending on how many meteors spawned, but there will be more monsters to fight. (About 2-4 boulders = 2-4 chests)
- Previously, 4 bells located throughout the city were required to be rung in order to escape the depths.
- This was adjusted, likely because of how much time it took and how risky it was, causing players to use unintended but easier methods.
- In the same update, one of the elevator entrances were replaced with the sub-elevator, with a risky approach.

