The Relentless was an Imperial I-class Star Destroyer commanded by Admiral Kassius Konstantine. On the day of the Galactic Empire's fifteenth anniversary, it was requisitioned by the Grand Inquisitor, the Emperor's Jedi hunter, to give chase to a group of rebellious individuals who tried to smuggle Tseebo off of the planet Lothal.[6]
History[]
Pursuit of the Ghost[]
The Relentless was an Imperial I-class Star Destroyer under the command of Admiral Kassius Konstantine. On the day of the Galactic Empire's fifteenth anniversary, it was requisitioned by the Grand Inquisitor, the Emperor's Jedi hunter, to give chase to a group of rebellious individuals who tried to smuggle Tseebo off of the planet Lothal. The Inquisitor had placed a XX-23 S-thread tracker on the rebels' ship, the Ghost, and started pursuing them in hyperspace. When the rebels found the tracker, they discovered it had actually attached to the ship's shuttle, the Phantom. So two of the rebels, the Jedi Kanan Jarrus and Ezra Bridger, detached the shuttle and landed on Fort Anaxes. The Grand Inquisitor, onboard the Relentless, followed the signal, enabling the Ghost's escape while the Inquisitor and his troops faced the rebels on the asteroid, being defeated.[6]
Deceit of Calrissian[]
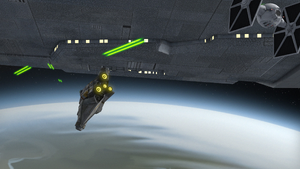
Later the rebels, working with the smuggler Lando Calrissian, tried to sneak past the Imperial blockade of Lothal after acquiring a puffer pig from the crime lord Azmorigan. The Ghost had a signature modulator to disguise itself when dealing with Imperial ships. Some problems with the pig, however, led to the modulator being disabled, so the Relentless was able to identify the ship. Konstantine deployed TIE fighters and tried to take down the Ghost with turbolasers, but the light freighter took cover in Lothal's clouds, shooting the TIEs down and preventing the Relentless from continuing the pursuit.[7]
Siege of Lothal[]

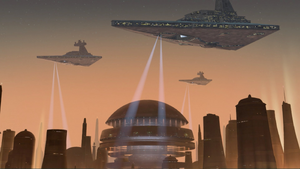
Star Destroyers locking down Lothal.
The Relentless was one of the Star Destroyers chosen by the Empire to besiege Lothal. The rebels, after leaving Capital City, asked Calrissian to help them smuggle themselves offworld, and he offered them some equipment to leave the planet without being detected by Imperial forces. They launched some modified masking transponders in Lothal's sky, which replicated the signal of their stolen Sentinel-class landing craft. Konstantine deployed TIE fighter squadrons to follow the signals, but by the time he understood the rebels' trick, they had already departed Lothal's atmosphere. However, Konstantine and his crew were mollified when it was revealed that Darth Vader had already placed a tracker on the shuttle.[11]
The Sith Lord reached the rebels, who had rendezvoused with their allies in Phoenix Cell, and attacked their ships with his TIE Advanced x1. The Relentless and other Star Destroyers joined Vader when the battle was already lost for the rebels in an attempt to prevent their enemies from escaping. While Vader had succeeded in destroying the rebel command ship Phoenix Home, most of the Phoenix fleet, with the exception of the Ghost, had already managed to flee into hyperspace. The Relentless and another Star Destroyer attempted to trap the Ghost. However, the freighter's captain, Hera Syndulla, managed to jump into hyperspace before the Relentless and the other Star Destroyer could activate their tractor beams, and they captured Vader's TIE Advanced instead, to Konstantine's horror.[11]
Hunting the rebellion[]

The Ghost evading the blockade over Lothal.
Following the attack on the Phoenix fleet, the Relentless took part in a hunt for the fleeing rebels throughout the Outer Rim Territories. At a later point, Admiral Konstantine and Agent Kallus received a transmission from the former Clone Commander Wolffe that the crew of the Ghost were on Seelos.[13] While the Relentless stayed in space to provide backup, Kallus led a ground assault force of three AT-AT walkers against the crew of the Ghost and the clone troopers Rex, Gregor, and Wolffe, who manned an antiquated AT-TE walker. The Relentless was unable to provide air support to Kallus' forces during the battle because the ship had received orders to pick up an Inquisitor known as the Fifth Brother in deep space.[12]
Later, the Relentless detected a power surge from an abandoned Old Republic Haven-class medical station in deep space. The surge had been caused by several crew members of the Ghost crew, who were salvaging medical supplies from the abandoned station. When Admiral Konstantine offered to provide reinforcements, the Fifth Brother insisted on going alone. During the ensuing skirmish, he another Inquisitor known as the Seventh Sister nearly succeeded in capturing several rebels including Chopper, Ezra Bridger and Sabine Wren. However, the rebels were able to escape due to the quick thinking of Garazeb Orrelios.[17]
After the Seventh Sister and the Fifth Brother discovered that the Phoenix rebels were hiding on the planet Garel, the Relentless was part of the Imperial fleet that attacked Garel. During the battle, the Relentless and its fellow Star Destroyers bombarded the escaping rebel ships and unleashed several TIE fighters. Under the command of Admiral Konstantine, the Relentless also managed to snag the rebel command ship Liberator with its tractor beam projector. However, Hera managed to use the Ghost to knock out the Relentless' tractor beam projector, allowing the Liberator to flee into space.[15]

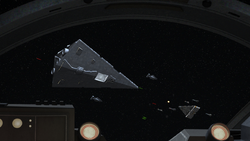
The Relentless attacking the rebel fleet in space
The Relentless later led an attack on the Phoenix rebel fleet, which was low on fuel. When the ship's scanners picked up the rebel ship known as the Ghost, Konstantine recognized it as the vessel that had raided the Imperial fuel depot at Horizon Base. Realizing that the rebels were low on fuel, he ordered the Relentless and its TIE fighter escorts to prevent the Ghost from landing. Despite their best efforts, the Ghost managed to land due to the timely intervention of Ketsu Onyo's starship, the Shadow Caster. After receiving intelligence from the astromech droid Chopper and the inventory droid AP-5, the rebel fleet fled to Atollon, a safe system with no Imperial presence.[16]
Appearances[]
- Star Wars Rebels webcomic
- Star Wars Rebels: Ezra's Duel with Danger
 Star Wars Rebels — "Gathering Forces" (First appearance)
 Star Wars Rebels — "Idiot's Array"
- Star Wars Rebels: The Siege of Lothal
 Star Wars Rebels — "The Lost Commanders"
 Star Wars Rebels — "Relics of the Old Republic"
 Star Wars Rebels — "Always Two There Are"
 "No Sympathy" — Star Wars Rebels Magazine 14
 Star Wars Rebels — "Legacy"
 "Academy Cadets" — Star Wars Rebels Magazine 18
 Star Wars Rebels — "The Forgotten Droid"
Sources[]
 "Gathering Forces" Trivia Gallery on StarWars.com (backup link) (Slide 5)
 Star Wars Helmet Collection 33 (Databank A-Z: Admiral Kilian–Kowakian)
 Star Wars Helmet Collection 75 (Highlights of the Saga: Joining Phoenix Squadron) (Indirect mention only)
 Star Wars: Armada — Upgrade Card Collection (Card: Relentless)
 Star Wars: Unlimited — Spark of Rebellion (Card: Relentless—Konstantine's Folly) (SWUDB backup link)
Notes and references[]
- ↑ 1.00 1.01 1.02 1.03 1.04 1.05 1.06 1.07 1.08 1.09 1.10 1.11 1.12 Ultimate Star Wars
- ↑ 2.0 2.1 2.2 Star Wars Rebels: The Visual Guide
- ↑ Star Wars Super Graphic: A Visual Guide to a Galaxy Far, Far Away
- ↑ Star Wars Rebels: Head to Head
- ↑ 5.0 5.1 5.2 5.3
 Star Wars: Card Trader (Card: Star Destroyer - Blueprints)
- ↑ 6.00 6.01 6.02 6.03 6.04 6.05 6.06 6.07 6.08 6.09 6.10 6.11 6.12 6.13
 Star Wars Rebels — "Gathering Forces"
- ↑ 7.0 7.1 7.2 7.3
 Star Wars Rebels — "Idiot's Array"
- ↑ Star Wars Rebels: Droids in Distress
- ↑ 9.0 9.1 9.2 9.3 9.4 Star Wars: Rogue One: The Ultimate Visual Guide
- ↑ Star Wars: TIE Fighter Deluxe Book and Model Set
- ↑ 11.0 11.1 11.2 11.3 11.4 11.5 11.6 11.7 Star Wars Rebels: The Siege of Lothal
- ↑ 12.0 12.1 12.2 12.3 12.4
 Star Wars Rebels — "Relics of the Old Republic"
- ↑ 13.0 13.1 13.2 13.3 13.4
 Star Wars Rebels — "The Lost Commanders"
- ↑ Star Wars: Absolutely Everything You Need to Know
- ↑ 15.0 15.1
 Star Wars Rebels — "Legacy"
- ↑ 16.0 16.1
 Star Wars Rebels — "The Forgotten Droid"
- ↑
 Star Wars Rebels — "Always Two There Are"
