| Dual Katanas | |
|---|---|

| |
| Statistics | |
| Strength | Medium |
| Speed | Medium |
| Range | Medium |
| Maximum Level | 4 |
| First Appearance | |
| Debut | Ninja Gaiden Sigma |
The Dual Katana are weapons that appear in Ninja Gaiden Sigma, Ninja Gaiden Sigma Plus, Ninja Gaiden II, Ninja Gaiden Sigma 2 Ninja Gaiden Sigma 2 Plus and Ninja Gaiden 3: Razor's Edge.
Dragon's Claw and Tiger's Fang[]

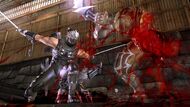
Ryu slashing with the paired Katanas.
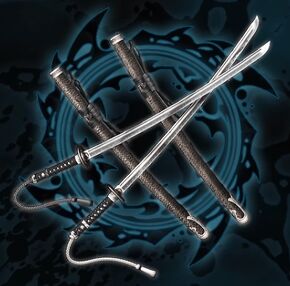
Dragon's Claw and Tiger's Fang (巌龍、伐虎 Gen Ryū, Ba Ko?, Rock Dragon, Cutting Tiger) are two katana wielded together by Ryu in Ninja Gaiden Sigma, Ninja Gaiden Sigma Plus, Ninja Gaiden II, Ninja Gaiden Sigma 2 and Ninja Gaiden Sigma 2 Plus. Though less nimble than the Dragon Sword, these twin blades cause a considerably higher amount of damage. They are also a great all-around weapon good for moderate crowd control. They are fast and deadly and can tear up almost everything. This is one of only two weapons that can be upgraded to level four. (However the Level 4 upgrade replaces the blades with the Dragon Sword and Blade of the Archfiend)
Location[]
In Ninja Gaiden Sigma they are found in Chapter 3 - Skies Of Vengeance, in one of the small rooms leading from the main foyer, in the Airship.
In Ninja Gaiden II, they are found in Chapter 4 - A Captive Goddess, in Liberty Island, when you enter a room containing several items at the bottom of the Statue Of Liberty. Most of these items are displayed behind a glass wall. Break the glass to recover the items. There are Incendiary Shuriken inside, a Test of Valor in the corner, and more importantly, the Dragon’s Claw and Tiger’s Fang.
In Ninja Gaiden Sigma 2 and Ninja Gaiden Sigma 2 Plus, they are found stuck in a dead body in Chapter 6 - The Aqua Capital, near an Earth Dragon Statue.
Description[]
These two Japanese swords are wielded as a pair.
It might seem difficult to hold one blade in each hand, but these swords have been modified to allow them to be wielded together. The tsuba, or hand guard, of each weapon has holes in it to reduce the weight close to the sword hand. This design, known as a Musashi-tsuba, was first proposed by the legendary swordsman Miyamoto Musashi. No one knows when the swords were forged but it is rumored that each blade bears the inscription "Muramasa (村正)".
True Dragon Sword and Blade of the Archfiend[]
The True Dragon Sword and Blade of the Archfiend are used in conjunction as the Level 4 replacement for the Dragon's Claw and Tiger's Fang in Ninja Gaiden II, Ninja Gaiden Sigma 2 and Ninja Gaiden Sigma 2 Plus; as well as the Dual Katana equipped by Ryu in Chapter Challenge and Ninja Trials in Ninja Gaiden 3: Razor's Edge.
Description[]
- True Dragon Sword and Blade of the Archfiend
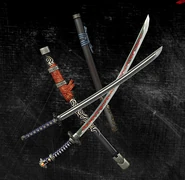
The True Dragon Sword and Blade of the Archfiend, wielded together.
When the Dragon Sword and the Blade of the Archfiend are wielded together, the enormity of their combined ancient power is immeasurable. Although the cursed Blade of the Archfiend has been described in legends since antiquity, the circumstances of its origin are unknown. One prevailing theory suggests that the blade was forged from the molten remains of an iron meteorite that had been breathed upon by the Archfiend. When the Archfiend’s evil magic that is trapped inside the sword reacts to the power of the wielder, sparks run up and down the length of the blade.
The inscription on the blade’s surface is written in divine characters that are incomprehensible to humans. One interpretation of its meaning reads: “Praise be the order brought forth from the very edge of chaos.” The Blade of the Archfiend has been passed down through the generations to the most ruthless and powerful members of the Black Spider Clan and was the favored weapon of their leader, the Ninja Overlord Genshin.
Jinran-Maru and Blade of the Archfiend[]
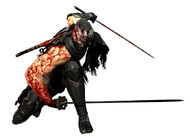
In Ninja Gaiden 3: Razor's Edge, the Dual Katana make a reappearance with the Blade of the Archfiend and Jinran-Maru instead of Dragon's Claw and Tiger's Fang/Blade of the Archfiend and Dragon Sword (Though in the Ninja Trials, Ryu uses these two weapons). They have a significantly different moveset to the previous iterations of the Dual Katanas.

Ryu with the Blade of the Archfiend & Jinran-Maru in NG3
Location[]
These are acquired in Day 5 when Ryu obtains the Blade of the Archfiend from the graveyard.
Advantages[]
- Strong against large strong foes and tears up the little ones.
- Fast and agile and can mimic other weapon attacks.
- Can be upgraded to level 4. (NGII/Sigma 2/2+)
- Great for moderate crowd control.
- All-around good weapon for every ideal.
Disadvantages[]
- Slow moving swings on some combos on smaller enemies.
- Some attacks have a large amount of Recovery frames, leaving Ryu to be attacked (Sigma)
- Combo start ups are weak (NG Razor's Edge)
Moves List[]
Ninja Gaiden Sigma[]
Standing
- X, X, X, X L1
- X, Pause, X, X, X
- X, X, Y, Y L2
- X, X, X, Y, Y L1
- X, X, Forward, X, X L1
- X, X, Forward, X, X, X, L2
- X, X, Forward, X, X, X, X L3
- Forward, X, X L1
- Forward, X, X, X L2
- X, Hold Y, Y
- X, Y, Y L1
- X, Y, Y, Y L3
- X, Y, X, X, X, X L2
- X, Y, X, Y L1
- X, Y, X, Y, Y L3
- X, Y, X, X, Y L2
- X, Y, X, X, Y, Y L3
- X, Y, X, X, X, X L2
- X, Y, X, X, X, X, Y L3
- X, Y, X, X, X, Y L2
- Zhong Kui Swallow: X, Y, X, X, X, Pause, Y L2
- Y, Y, Y, Y
- Forward, Y, Y L1
- Forward, Y, Y, Y L3
- Forward, Y, X, X, X, X L2
- Forward, Y, X, X, X, Y L2
- Forward, Y, X, Y L1
- Forward, Y, X, Y, Y L3
- Forward, Y, X, X, Y L2
- Forward, Y, X, X, Y, Y L3
- Zhong Kui Swallow: Forward, Y, X, X, X, Pause, Y
- 360 L3 Y
- X (Counter)
- Y (Counter)
- Y (Downed enemy)
Aerial
- X L1
- X, Y L1
- X, Y, Y L3
- X, X, L2
- X, X, Y L2
- X, X, Y, Y L3
- X, X, X, X L2
- X, X, X, X, Y L3
- X, X, X, Y L2
- Zhong Kui Swallow: X, X, X, Pause Y L2
- Y L1
- Y, Y L3
- Flying Swallow: Forward Y
- Guillotine Throw: X+A while above enemy
Ninja Gaiden II/Sigma 2/Sigma 2 Plus[]
Normal
- Falling Flowers X, X, X, X, X L1
- Blade of Nirvana X, X, X, X, Y L2
- Mahayana Blade X, X, X, Y, Y L1
- Blade of Dharma’s Way X, X, Y, Y L2
- Double Lightning Strike X, X, Forward + X, X L1
- Lightning Pierce X, X, Forward + X, X, X L2
- Penetrating Lightning X, X, Forward + X, X, X, X L3
- Bladed Wind X, X, Forward + X, Y L3
- King Slayer X, X, Forward + Y L2
- Emperor Slayer X, X, Forward + Y, Y L3
- Underworld Drop (Throw) X, X, Forward + Y, Y, Y, Y L4
- Blade of the Mind X, X, Forward + Y, Y, Y, Y, Y L4
- Falling Dragon X, X, X, Forward + X L1
- Double Zhong Kui Slash X, Y, X L1
- Mighty Zhong Kui X, Y, X, X, X, X L2
- Spinning Zhong Kui X, Y, X, X, X, X, Y L3
- Zhong Kui Izuna (Throw) X, Y, X, X, X, Y L2
- Zhong Kui Heavenly Sparrow X, Y, X, X, X, Pause, Y L2
- Dragon Slaying Sparrow X, Y, X, X, X, Pause, Y (hold when hitting wall) L2
- Falling Dragon Slayer X, Y, X, X, X, Pause, Y (when hitting wall), X L2
- Spinning Dragon Slayer X, Y, X, X, X, Pause, Y (when hitting wall), Y L2
- Great Dragon Slayer X, Y, X, X, X, Pause, Y (when hitting wall), Y, Y L3
- Bird and Dragon X, Y, X, X, X, Pause, Y (when hitting wall), A L2
- Falling Zhong Kui X, Y, X, X, Y L2
- Zhong Kui Whirlwind X, Y, X, X, Y, Y L3
- Fire Dragon Spinning Descent X, Y, Y L1
- Spinning Fire Dragon X, Y, Y, Y L3
- Purgatory Slash X, Hold Y L1
- Wind and Clouds X, Hold Y, Y L2
- Divine Blade X, Hold Y, Y, Y L3
- Underworld Drop (Throw) X, Hold Y, Y, Y, Y, Y L4
- Blade of the Mind X, Hold Y, Y, Y, Y, Y, Y L4
- Twin Continuous Slash Forward + X, X L1
- Twin Cross Cut Forward + X, X, X L2
- Flying Dragon Forward + X, Y L1
- Descending Dragon Forward + X, Y, Y L2
- Swooping Dragon Fang Y, Y, Y, Y L1
- Great Chasm Y, Y, Forward + Y 3
- Rolling Haze Slash Hold Y L1
- Path of the Demon Dragon Hold Y with essence L1
- Eight Heavenly Dragons Hold Y with maximum essence L1
- Rising Earth Blade Forward + Y L1
- Purgatory Slash Forward + Hold Y L1
- Silent Gale X (while running) L1
- Gale Cross Cut X, X (while running) L2
- Gale Rising Slash Y (while running) L1
- Gale Falling Slash Y, Y (while running) L2
- Rise to Heaven Circle + Y L2
- Sokaku’s Secret Blade X (while blocking) L1
- Sokaku’s Dissecting Slash Y (while blocking) L1
- Ground Roll Y (next to downed enemy) L1
In Air
- Double Zhong Kui Slash X L1
- Mighty Zhong Kui X, X, X, X L2
- Spinning Zhong Kui X, X, X, X, Y L3
- Zhong Kui Izuna (Throw) X, X, X, Y L2
- Spin Slash Y L1
- Whirlwind Slash Y, Y L3
- Flying Swallow Y (while jumping towards enemy) L1
- Guillotine Throw (Throw) A + X (while jumping near enemy) L1
On Wall
- Divine Hawk Flying Sparrow X or Y (while wall running) L1
- Divine Hawk Twin Blades X L1
- Descending Divine Hawk Y L1
- Spinning Divine Hawk Y, Y L3
- Divine Hawk Dancing Blades X (during Flying Bird Flip) L1
- Flying Bird Descent Y (during Flying Bird Flip) L1
- Flying Bird Spin Y, Y (during Flying Bird Flip) L3
In Water
- Flying Water X, X, Y (while running on water) L1
- Aqua Chasm X, Y (while running on water) L1
- Flying Hawk Y (while running on water) L1
- Aqua Chasm X, Y (at water surface) L1
- Heavenly Bay Y (at water surface) L1
- Root of the Lotus X (underwater) L1
- Water Dragon Blade Y (underwater) L1
Movement
- Reverse Wind Left Trigger + any movement L1
- Wind Path A (while jumping near enemy) L1
- Wind Run A + X L1
- Flying Bird Flip A (on wall) L1
- Calm Water Run A + X (while running on water) L1
- Calm Water Break Left Trigger + A (while running on water) L1
Ninja Gaiden 3: Razor's Edge[]
(Since Razor's Edge has every name for every input, the list here only provide the most relevant inputs per level.)
Standing and Sliding
- Severing Storm: X, X, X, X, X 1
- Demon Thorns: X, X, X, X, Y 1
- Crag Swallow: X, X, X, Y, Y 1
- Divine Crag Swallow: X, X, X, Y, Y, Y, Y 2
- Crag Guardian Thrust: X, X, X, Y, On Landing Y 2
- Crag Guardian Thorns: X, X, X, Y, On Landing Y, Y 3
- Trial of Lightning: X, X, Forward X, X, X 1
- Trial of Earth: X, X, Forward X, X, X, Y 2
- Can chain into any Standing Jump Combos
- Trial of Hell: X, X, Forward X, Y, Y (If no enemy in the air)1
- Underworld Drop (Throw): X, X, Forward X, Y, Y 2
- Hellfire Torment: X, X, Forward Y 1
- Bloody Torment: X, X, Forward Y, Y 2
- Blade Torment: X, X, Forward Y, Y, Y 3
- Fury of Prajna: X, X, Y 1
- Fury of Dharma: X, X, Y, Y 2
- Fury of Moksa: X, X, Y, Y, Y, Y 3
- Mighty Zhong Kui: X, Y, X, X, X, X 1
- Underworld Drop (Throw): X, Y, X, X, X, Y 2
- Zhong Kui Heavenly Sparrow: X, Y, X, X, X, Pause, Y, Y 2
- Whirlwind Slash: X, Y, Y, Y 1
- Purgatory's Realm: X, Hold Y 1
- Divine Rage: X, Hold Y, Y 2
- Tombo Guardian Thorns: X, Hold Y, Y, Y, On Landing Y, Y 3
- Divine Tombo Swallow: X, Hold Y, Y, Y, Y, Y, Y 3
- Twin Wrath Cross: Forward X, X, X 1
- Rising Slash Fury: Forward X, Y 1
- Can chain into any Standing Jump Combo
- Dragon's Fang Wrath: Y, Y 1
- Dragon Fang - Fire: Y, Y, Y, Y 2
- Dragon Fang - Earth: Y, Y, Y, Y, Y, Y 3
- Great Chasm: Y, Y, Forward Y 2
- Can chain into any Standing Jump Combo
- Mighty Zhong Kui: Forward Y 1
- Can chain into any Standing Jump Combo
- Rolling Haze Slash: Hold Y 1
- Rise to Heaven: 360 Spin Y 2
Running
- Gale Cross: X, X 1
- Gale Zhong Kui: X, Y 1
- Can chain into any Standing Jump Combo
- Gale Thrust: Y 1
- Violent Gale: Y, Y 2
- Guardian Thorns: Y, Y, Y, Y 3
Standing Jump
- Peacock Slash: X (If no enemy launched to air) 1
- Mighty Zhong Kui: X, X, X, X 1
- Underworld Drop (Throw): X, X, X, Y 2
- Zhong Kui Heavenly Sparrow: X, X, X, Pause, Y, Y 2
- Spin Slash: Y 1
- Whirlwind Slash: Y, Y 1
Running Jump
- Peacock Slash: X 1
- Spin Slash: Y 1
- Flying Swallow: Forward Y 1
- Azure Swallow: Forward Y, Y 2
- Divine Swallow: Forward Y, Y, Y 2
Sliding Hit
- Surging Slash: X 1
- Can chain into any Standing Jump Combo
- Twin Severing Heaven: Y 1
Landing
- Rolling Haze Slash: Hold Y 1
- Rise to Heaven: 360 SPin Y 2
Wall Jump and Wall Run
- Peacock Slash: X 1
- Divine Hawk Flying Sparrow: Y 1
Flying Bird Flip:
- Divine Hawk Dancing Blades: X or Y 1
- Dancing Cyclone: Y, Y 1
Sabaki/Counter Attack
- Sokaku's Secret Blade: X 1
- Sokaku's Zhong Kui: Y
- Can chain into any Standing Jump Combo
Trivia[]
- In Ninja Gaiden II, they are replaced by Blade Of The Archfiend + True Dragon Sword at level 4.
- In Ninja Gaiden Sigma, it states on the description that it was reportedly wielded by a dual katana master. This may be reference to Miyamoto Musashi, the first man to dual wield Katanas effectively in Japan.


