“'Oh, we'll just run in there, eradicate the darkspawn and be back in time for supper.' Well... whoops.” ―Sigrun
Last of the Legion is a main quest in Dragon Age: Origins - Awakening.
Background[]
Captain Garevel reports that two hunters, Colbert and Micah, has stumbled across an entrance to the Deep Roads and a cave full of darkspawn. He suggests that this matter needs to be investigated.
Walkthrough[]
City of Amaranthine[]
Proceed to Amaranthine and interview Colbert near the entrance to the city. He will show you the location of a chasm in the Knotwood Hills. The quest journal and the world map will update accordingly.
Knotwood Hills and Kal'Hirol[]

After descending into the chasm of the Knotwood Hills, the Warden-Commander encounters Sigrun, a female, dwarven Legionnaire Scout, who can join the party before further venturing into Kal'Hirol. Within Kal'Hirol, another Legion of the Dead member, Jukka, informs you of the broodmothers before dying shortly afterwards. Across the bridge, where you meet a small group of deep stalkers, you can find an Ancient Dwarven Crate containing Ancient Boots, which later become Greaves of Hirol's Defense.
At the courtyard, if Sigrun is in the party she will tell you that most places that dwarves built have secret entrances into the main chamber. On the left of the courtyard is the switch to the secret passage. Using the side entrance avoids the pressure plate traps that line the Entrance Chamber. Without Sigrun in the party, there is no possible way to enter the Side Entrance.
Kal'Hirol - Main Hall[]
Within the main hall at the Entrance Chamber (16 traps, disabling earns a total of 480 XP, but 2 may be difficult or impossible to detect), the next encounter is with the Golem Master, a darkspawn emissary who commands golems. He carries a Golem Control Rod, which the Warden-Commander can use on the Inert Golem which is semi-embedded in the left wall of the hallway to the East. Follow the Inert Golem to an encounter with an Emissary on top of a trap-laden stone bridge. At the Southern end of the bridge is a chest, while the Northern side loots some scrolls containing Masterpiece Paralyze Rune Tracing and Paragon Paralyze Rune Tracing. Descend down past some ghost dwarves fighting a battle.
The Commons is the next area, where a ghost bearing the likeness of Dailan is on a platform and is addressing a crowd of dwarves. Head southwards towards the Slums, where on the immediate right (westerly) is the Cracked Breastplate (Breastplate of Hirol's Defense), Paragon Cold Iron Rune Tracing and Masterpiece Cold Iron Rune Tracing and, after battling some corrupted spiders, on the left (easterly direction) is the Codex entry: A Scout's Report.
Head further southwards from the Slums to the southernmost point of the map, where there is a group of darkspawn including a Disciple Scout and genlock emissary. The Gravity Trap Plans and a Moldy Journal (Codex entry: Dailan's Journal) are located here. Continuing on north-east there will be 2 dwarven ghosts talking and straight ahead will be a lyrium-infused skeleton containing Lyrium Sand. Beside this room, to the north, is a room with the Lyrium Ring (gift), Paragon Immunity Rune Tracing, Masterpiece Immunity Rune Tracing and a wall carving for Codex entry: The Fortress of Kal'Hirol.
Continue to the other side of the Commons, but before entering the Trade Quarter, head north to battle a hurlock emissary who drops the Shattered Maul (Valos Atredum) and the Staff of Vigor. In the middle of the room there will be stairs leading to a chest that contains Sureshot Bolt x20 and a Expert Silverite Rune.
Kal'Hirol - Trade Quarter[]
In the Trade Quarter, after the cinematic cutscene immediately on the left is Paragon Hirol's Shrine, which contains the Codex entry: The Paragon Hirol and Hirol's Sarcophagus with the Girdle of Kal'Hirol inside. Disturbing the sarcophagus will activate three Steel Golems. To the right of the sarcophagus there is a pile of scrolls on the ground which contains Elemental Rune Tracing. The next rooms contain Invading Hurlocks and Hurlocks in-fighting. The southern room contains a Commemorative Marker (Memories of the Stone side quest) and also Greater Stamina Draught Recipe, Partha and a Broken Sword (Kallak).

The Disciple leading The Architect's forces.
Head north across the stone bridge and in the chamber on the left there are the Engraved Silver Bracers and Lyrium Sand.
Backtrack and head north down the steps to the Forge area. The Iron Deposit containing Iron Ore for Elemental Requirements is located here. Across the lava bridge, are the Masterpiece Flame Rune Tracing, Paragon Flame Rune Tracing, Damaged Axe (Heirsplitter), a Lyrium Bucket (which is used to initiate a discussion with Anders), and the Repair Equipment golem for fixing the various damaged items picked up.
The next area is the Prison with a lone human prisoner, Steafan. Freeing him grants you a Masterpiece Flame Rune. In the next room are some childer hatchlings and to the south of this room is a runestone puzzle, which will grant the Gauntlets of Hirol's Defense and Nature's Blessing once complete. To complete the puzzle basically entails matching the floor rune to the wall rune by clicking on any two runes in quick succession to swap them.
Backtrack and continue west along the childer-infested passage, whilst collecting the Helm of Hirol's Defense, Masterpiece Stout Rune Tracing, Paragon Stout Rune Tracing, and Carved Greenstone from the Treasury, before ending up in a room with multiple routes - a passage north to the map's starting point, an exit returns to the Knotwood Hills (which you should probably use, since there is a bug/glitch associated with Sigrun's Joining), and the last exit continues to the Lower Reaches.
Kal'Hirol - Lower Reaches[]
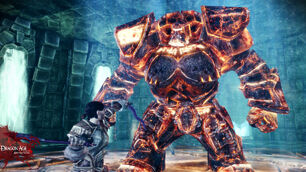
In the Lower Reaches, the Warden-Commander faces The Lost and his Inferno golem simultaneously. The golem drops Inferno Golem Shell for Golem's Might and the Lost drops the Staff of the Lost.

Promotional image with Sigrun facing the Inferno golem
Further along the passageway, three broodmothers await. You cannot engage them in direct combat, even with ranged or AoE attacks. Instead, all that is needed is to break two of the four chains suspended above the broodmother pit; this drops a massive lyrium storage container on them, killing them.
If Sigrun is in the party, a dialogue will start, providing an opportunity to recruit her or let her go.
Rewards[]
- 1000 XP - finding Colbert and getting location of Knotwood Hills
- 3500 XP - finding Sigrun and learning about the darkspawn army in Kal'Hirol
- 3500 XP - finding the invading forces in the Trade Quarter
- 6000 XP - after killing the 3 broodmothers
Side quests[]
![]() Bombs Away!
Bombs Away!
![]() Elemental Requirements
Elemental Requirements
![]() Golem's Might
Golem's Might
![]() Heart of the Forest
Heart of the Forest
![]() The Long-Buried Past
The Long-Buried Past
![]() Lucky Charms
Lucky Charms
![]() Memories of the Stone
Memories of the Stone
![]() Runestone puzzle - unmarked optional side quest
Runestone puzzle - unmarked optional side quest
Notable items[]
![]() Inferno Golem Shell, source: Inferno golem
Inferno Golem Shell, source: Inferno golem
![]() Iron Ore, source: Iron deposit
Iron Ore, source: Iron deposit
![]() Lyrium Sand, source: Lyrium-infused skeleton and Lyrium deposit
Lyrium Sand, source: Lyrium-infused skeleton and Lyrium deposit
![]() Battlemage's Cinch, source: The Lost
Battlemage's Cinch, source: The Lost
![]() Staff of the Lost, source: The Lost
Staff of the Lost, source: The Lost
![]() Staff of Vigor, source: Hurlock emissary
Staff of Vigor, source: Hurlock emissary
Optionals
![]() Breastplate of Hirol's Defense, from Cracked Breastplate
Breastplate of Hirol's Defense, from Cracked Breastplate
![]() Gauntlets of Hirol's Defense, source: Sarcophagus - opens after solving the Runestone puzzle
Gauntlets of Hirol's Defense, source: Sarcophagus - opens after solving the Runestone puzzle
![]() Girdle of Kal'Hirol, source: Hirol's sarcophagus
Girdle of Kal'Hirol, source: Hirol's sarcophagus
![]() Greaves of Hirol's Defense, from Ancient Boots
Greaves of Hirol's Defense, from Ancient Boots
![]() Heirsplitter, from Damaged Axe
Heirsplitter, from Damaged Axe
![]() Helm of Hirol's Defense, source: Chest in Treasury
Helm of Hirol's Defense, source: Chest in Treasury
![]() Hirol's Defense armor set, source: various
Hirol's Defense armor set, source: various
![]() Kallak, from Broken Sword
Kallak, from Broken Sword
![]() Valos Atredum, from Shattered Maul
Valos Atredum, from Shattered Maul
![]() Nature's Blessing, source: Sarcophagus - opens after solving the Runestone puzzle
Nature's Blessing, source: Sarcophagus - opens after solving the Runestone puzzle
![]() Partha, source: Dailan's corpse
Partha, source: Dailan's corpse
Notable gifts for companions:
![]() Carved Greenstone, source: Chest
Carved Greenstone, source: Chest
![]() Engraved Silver Bracers, source: Pile of bones
Engraved Silver Bracers, source: Pile of bones
![]() Hirol's Lava Burst, source: Chest
Hirol's Lava Burst, source: Chest
![]() Lyrium Ring, source: Chest
Lyrium Ring, source: Chest![]() Whetstone, source: Crate
Whetstone, source: Crate
Craft recipes[]
Herbalism[]
![]() Greater Stamina Draught Recipe
Greater Stamina Draught Recipe
Trap-Making[]
Runecrafting[]
![]() Masterpiece Cold Iron Rune Tracing
Masterpiece Cold Iron Rune Tracing
![]() Paragon Cold Iron Rune Tracing
Paragon Cold Iron Rune Tracing
![]() Masterpiece Flame Rune Tracing
Masterpiece Flame Rune Tracing
![]() Paragon Flame Rune Tracing
Paragon Flame Rune Tracing
![]() Masterpiece Immunity Rune Tracing
Masterpiece Immunity Rune Tracing
![]() Paragon Immunity Rune Tracing
Paragon Immunity Rune Tracing
![]() Masterpiece Paralyze Rune Tracing
Masterpiece Paralyze Rune Tracing
![]() Paragon Paralyze Rune Tracing
Paragon Paralyze Rune Tracing
![]() Masterpiece Stout Rune Tracing
Masterpiece Stout Rune Tracing
![]() Paragon Stout Rune Tracing
Paragon Stout Rune Tracing
![]() Elemental Rune Tracing
Elemental Rune Tracing
Bugs[]
- If Last of the Legion is the last of the three main quests to be completed before the battle for the Keep or Amaranthine, you will not be able to make Sigrun into a Grey Warden. A workaround is take the exit back to the Knotwood Hills at the end of the Trade Quarter and induct Sigrun into the Grey Wardens before returning to complete Last of the Legion.
- There is a graphics bug that sometimes happens, the result of which is that after the Warden has broken a chain to kill the Broodmothers, the characters' arms will look as though they have their weapons drawn even when they are not.
