Showing posts with label Decorating. Show all posts

Monday, November 25, 2013

The Story of a Vintage Dresser #DIY #Makeover


Happy Monday, friends!

Today I have a story to share with you. 

I like to call it the Story of a Vintage Dresser...


One summer (this past summer in fact), a young lady (that would be me) was looking for a new dresser for her master bedroom. The thing is, she wanted something original & with a bit of character.
AND she didn't want to spend a load of money.

Not asking much, was she?

Enter the superhero, Kijiji.

While browsing Kijiji's furniture selections one day, she came across this old gem.


The bones were great, but it needed to be brought into this century. 

After purchasing it for $80, now began the work of updating this piece.

Sanding...


Adding legs & a coat of primer...


One coat of grey...


The second coat of grey...


New handles...


And she's done & in her new home!


The End. :)

One last Before & After...


I love the lines of this piece & am super, super pleased with how it turned out! 

One little tidbit that you may or may not have noticed: After putting on the new handles & living with the dresser for a week or so, I noticed that the bottom right handle looked a little different from the rest. After looking a little closer, I saw that sure enough, that handle was the antiqued version of the handle style I had chosen. It must have gotten mixed up in the wrong drawer at Home Depot. I have since replaced it with one that matches the rest.

Just keeping' it real. :)

Thanks for reading. If you like what you see here on Silver Boxes, I'd love it if you would become a follower on Google Friend Connect, subscribe by email (sign up on the right sidebar), 
or follow along on FacebookPinterestInstagram, or Twitter
And please leave a comment when you do so I know who my new friends are! :)


Enjoy Your Day!


Wednesday, June 12, 2013

Boys Room Reveal!

The day is finally here! 

After giving myself the challenge of completing my son, Parker's, bedroom makeover by the end of May, bit by bit I got projects done & this past weekend we were able to put on the finishing touches. 

Let me show you around! Come on in!


This yellow-with-black-trim room was how it looked when we moved here 6 years ago. And wasn't my little guy cute when he was just 4? I just want to kiss those cheeks! (He's still cute, btw!)


When we moved here, we painted his room & replaced the flooring, but that's about it. 

Wednesday, June 05, 2013

Wednesday, May 22, 2013

Boy's Room Makeover (Part 2): The Dresser


My son's room makeover marches on!

Last week, I painted his beat up dresser a fun shade of orange...


Here is the war-torn dresser before...
(Complete with little boy hieroglyphics from years past.)


Wednesday, May 01, 2013

Boy's Room Makeover (Part 1): The Art Work


The month of May holds a fun DIY project for me — to makeover my son, Parker's bedroom. 

My to-do list includes:

I'm done the first thing on the list, so that's a start!


While we were on our epic summer vacation last summer, we picked up some memorabilia with Parker's room decor in mind.

We got these coasters in Cars Land at Disneyland & the Lego minifigures at Legoland (you'll see them below).


After picking up some frames from Michael's, I simply backed the openings with cardstock, then mounted these coasters on with some permanent adhesive squares.


Monday, February 04, 2013

Valentine Vignette

Happy Monday, friends! How was your weekend? Mine was great. I spent Friday night & all day Saturday at a scrapbooking retreat with some great friends. I'm still working on our Disney trip album from this past summer's trip. I'd say I'm at least half done & the end is in sight. I'll have some layouts to show you in the next few weeks.

~~~~~

Last week I was able to finish up our Valentine decorating. With my hubby in school for another few weeks, things are tight, so I didn't want to spend anything on my decorating. Because of this, my budget for this vignette was $0.


Here's how I pulled it together...

I reused many of last year's decorations...


...including the paper hearts & the button art I made & displayed in an embroidery hoop.


I just took the paper hearts off of the string they were on & piled them in a couple of vases.


I also used the pink rag wreath I made last spring. I had an empty picture frame that I looped the wreath to to display it.


I also used my snowy owls (since they're just too cute) along with the Valentine vase I showed you a bit ago.


There you have it! Everything was reused & found from around the house. It's amazing what you can come up with when you have a little imagination!


Thanks for reading. If you like what you see here on Silver Boxes, I'd love it if you would become a follower on Google Friend Connect, subscribe by email (sign up on the right sidebar), 
or follow along on FacebookPinterestInstagram, or Twitter
And please leave a comment when you do so I know who my new friends are! :)


Enjoy your day!


Friday, January 25, 2013

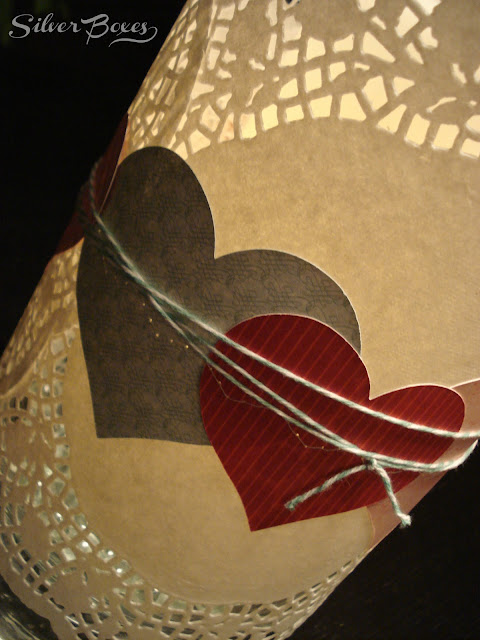
A Simple Valentine Centerpiece


Last week I started a couple of Valentine projects to spiffy up the house for February. 

Here's a super fast & easy Valentine centerpiece that you can whip up in under an hour!


All you need is a large cylinder vase, 3 paper doilies, paper hearts (I cut mine with my Cricut from some pretty scrapbook papers), a sewing machine, thread, & some baker's twine.


I started by laying out the paper doilies & arranging the hearts.


Then, I simply fed them through the sewing machine using a wide zigzag stitch.


I wrapped it around my vase & secured it with some turquoise baker's twine.


I added my trusty battery operated pillar candle.


Done!


(At night.)


I also cut some extra hearts & put them in my seasonal wreath. (You can see more seasons here & here.)


It's official: The Valentine's decorating has begun!

Have you started decorating for Valentine's Day? What kind of decor do you enjoy?

Check out more of my Valentine's crafts & decor...

A Valentine candy box


~~~~~

Thanks for reading. If you like what you see here on Silver Boxes, I'd love it if you would become a follower on Google Friend Connect, subscribe by email (sign up on the right sidebar), 
or follow along on FacebookPinterestInstagram, or Twitter
And please leave a comment when you do so I know who my new friends are! :)


Enjoy your day!


Friday, January 11, 2013

Letter Sweater Pillow {Breaking In My New Sewing Machine}


If you follow me on Facebook, you may have heard that I was blessed with a new sewing machine for Christmas.

Last weekend, I finally carved out some time to break it out of the box & try it out! 

This was my first project. 

Since I'm such a beginner at sewing I didn't attempt to do up a tutorial, but just wanted to share it with you. 


I used a thrifted sweater to sew the pillow cover & then used my cricut to cut out a template for the "P". I traced the "P" onto some grey felt, cut it out & sewed it on. 

It was pretty easy & didn't take me all that long.


My son, Parker was really excited to have a new little cushion on his reading chair. His reaction was priceless. Who knew a 9 year old would get so excited over a pillow? He must be a chip of the old block, as they say. :)

Here's to many more successful sewing projects!

Thanks for reading. If you like what you see here on Silver Boxes, I'd love it if you would become a follower on Google Friend Connect, subscribe by email (sign up on the right sidebar), 
or follow along on FacebookPinterestInstagram, or Twitter
And please leave a comment when you do so I know who my new friends are! :)


Enjoy your day!


Thursday, December 06, 2012

Sheet Music Tree Filler Ornaments


I found this neat sheet music tree ornament idea at a home decor store done slightly different & thought I could easily tweak it a bit to fit into my Christmas decor. Happily, I was right! It was really easy to make these cute tree fillers! 

For those of you who don't know what I mean by "tree fillers", here's my definition: Christmas decorations that don't hang on the branches but sit on the branches. I use twiggy things & sprigs of silver leaves, & now these little goodies on my Christmas tree.

Here's the how to:


Start with:

  • Sheet Music
  • Birds (or other decoration) on a wire stick
  • Decorating twigs (I used glittery blue & silver ones)
  • Hot glue gun
  • Tape
  • Wire cutters or pliers with wire cutters


Roll the sheet music & tape.


Take the wired birds & bend the wire into a "J" shape to start if off before you wrap it around the sheet music. If you don't, you'll crush the music.


Now wrap the wire around the rolled sheet music.


Cut some twigs off of the bunches you have, using wire cutters or pliers, arrange & glue the around the bird.


They were so fast to make too. I made 6 & it took me maybe half an hour - I'm happy about that!


What do you think? I'm slowly, but surely giving my Christmas tree decor a little makeover. And I'm doing it DIY style too! Next week, I'll have another sheet music ornament to show you as well as a tree topper. (Can you see a theme developing here? I can, and I love it!)


Thanks for reading. If you like what you see here on Silver Boxes, I'd love it if you would become a follower on Google Friend Connect, subscribe by email (sign up on the right sidebar), 
or follow along on FacebookPinterestInstagram, or Twitter
And please leave a comment when you do so I know who my new friends are! :)


Enjoy your day!


Monday, December 03, 2012

Decking The Halls

December is here & so is the winter weather here in Saskatchewan! 
We had yet another dump of snow last night & it certainly looks like Christmas outside. There's no shortage of snow this year! :)

It's also looking very Christmasy everywhere you go - including our house! 

Our halls are decked & Christmas preparations are in full force.

This year, I decorated in keeping with my silver theme, but added some turquoise into the mix. Just touches here & there, but it a little goes a long way. It's so pretty!


Most of our gifts are purchased & wrapped already, but we have a few left to buy.

I kept my sheet music wreath up from my fall decor & just changed out the seasonal touches. The clothes pins make it perfect for displaying Christmas cards!


A trifle bowl filled with shiny baubles & candles add a bit more sparkle to the living room.


My silver side table in the entryway is in its glory during the Christmas season.


I also found some beautiful printables to use in my decor this year. The one below is available here

I printed it off & backed it with wrapping paper. Into the frame it went & it adds so much to the decor as well as reminding us what the Christmas season is all about... the biggest birthday party ever!

Isn't that owl the cutest?

My lanterns also got a touch of Christmas added to them. One is filled with glittered pinecones, the large one has a battery operated candle on a timer so it comes on every evening. My sequinned reindeer finishes off this little grouping.


On the bar top between the living room & kitchen, I added another printable (available here) in a frame & more shiny baubles with a sweet little birdie.

And can you see my snowy owls in the background??


Here's panoramic shot (taken with my phone so not super high quality) of the living room & bar top.


One last little touch... My mom came & helped me decorate this year (btw, she's a professional interior decorator - I know, I'm blessed!) & between her & I we created this white, turquoise, & silver vignette on top of the cupboards in my kitchen. 

Lots of milk glass, some vintage pyrex, & more shiny baubles help bring Christmas into the kitchen as well.


There you go! I hope you enjoyed the tour of my main floor Christmas decor. I'll be sharing lots of Christmasy goodness over the month of December, so be sure to follow along!

Thanks for reading. If you like what you see here on Silver Boxes, I'd love it if you would become a follower on Google Friend Connect, subscribe by email (sign up on the right sidebar), 
or follow along on FacebookPinterestInstagram, or Twitter
And please leave a comment when you do so I know who my new friends are! :)


Enjoy your day!


Wreath featured on:

Blogging tips