-�������
- ���� (157)
- ����� (60)
- ������� (29)
- ������?������! (658)
- ������� (15)
- ������ (30)
- ��������������� (5)
- �������� (44)
- ������ (43)
- ������ �������� (6)
- ��������� (7)
- ���� (28)
- ������� (5)
- ��������� ������ (69)
- ���� (29)
- ������ (67)
- ������� ������ (124)
- ����� (12)
- ��� (5)
- ����� (28)
- ��������� ���� (6)
- ���� (14)
- ������� (40)
- ������� ��� �������� (831)
- ������ ����� (102)
- ������ (174)
- ���� (61)
- �������� (35)
- ��������� (8)
- ����� (23)
- ����� ������ (149)
- ������� (71)
- ������� ��� ������ (21)
- ������� ������� (147)
- ������ ���� (70)
- ���� (49)
- ������� ���������� (4)
- ������� (122)
- ������� (26)
- ������� (246)
- ������ (7)
- �������� (8)
- �������� (54)
- ��������-�������� (8)
- �������� (142)
- ������� � ��������� (68)
- ������� (1)
- ���� (7)
- ���� ��� (77)
- ������� (2)
- ����� (52)
- �����-���� (6)
- �������� (6)
- ������ ������� (12)
- ������� (2)
- ��������� (763)
- ������� (39)
- ���������� (21)
- ���� (151)
- �������� (8)
- ������� (60)
- ������� (63)
- �������� (5)
- ����� (53)
- �������� �� ����� (29)
- ����� (4)
- ������� ����� (42)
- ����� (103)
- ����������� (45)
- ����� (28)
- ������� (20)
- �������� (59)
- ����� (121)
- ������� ���� (10)
- �������� ������� (60)
- �������� ������ (29)
- ������ ������� (48)
- ��� ������� � ������� (7)
- ����� (207)
- ����� (25)
- ���� (59)
- ������� (19)
- ����� ���� (42)
-����� �� ��������
-���������� ��������
-����������
-����������
������ ������� � ���� ��������: �����(207), ������ �������(48), �������� ������(29), �������� �������(60), �����(121), ��������(59), �������(20), �����(28), ���������(763), �������(2), ������ �������(12), ��������(6), �����-����(6), �����(52), �������(2), ���� ���(77), ����(7), �������(1), ������� � ���������(68), ��������(142), ��������-��������(8), ��������(54), �������(246), �������(26), �������(122), ����(49), ������� �������(147), ������� ��� ������(21), ������� ��� ��������(831), �������(40), ������?������!(658), �������(29), �����(60), ����(157)
��� ��������� |
��� ������ ��������� ������_�������� [��������� ������� + � ���� �������� ��� ����������!]
|
��� ��������� |
��� ������ ��������� A_k_v_a_r_e_l [��������� ������� + � ���� �������� ��� ����������!]
�� ������� �����������, ��� Klaudia/Kszp �������� � ������ � �������! ���-��� ���� �� �� �����, � ��� ������� ������� � ��� ��������)


|
��� ��������� |
��� ������ ��������� labor_h [��������� ������� + � ���� �������� ��� ����������!]
��� ����� ����� ����� �������� �������� ��������� �� ������, ����� � ������ � ���� �� �����... � ��� ����� �� ��������� ����� � ��������... ��� �� �� ������ ��� ���?! �������, �������, �������... ����� � �� �����. �������� � ����������... � ��� �����, �������� ������� ���������� ������ Dorota_mk ...
��� ���������! �� ������ ��?! �� � ������� �� ������ �� ������!!!
|
��� ��������� |
��� ������ ��������� ���������� [��������� ������� + � ���� �������� ��� ����������!]
����������� ������ ��������
��������: http://sashas-inspirations.blogspot.com/
|
��� ��������� |
��� ������ ��������� ���������� [��������� ������� + � ���� �������� ��� ����������!]
|
��� ��������� |
��� ������ ��������� fljuida [��������� ������� + � ���� �������� ��� ����������!]
�������� � ���������� ��������� �� Laura Carson
������� ��������, �� ��� ������� � ����������� ���� ����������� ��������� � ��������� � ��� ���������� ������� ������� ���-������ ��������,������� ������� ���������� � �� ���������� � ������ �������� ���������� ����������� ������������� ��������, ������� �� ������� ��������� � ���������� ������ ����� �����, � �� ������ ���� :)

|
��� ��������� |
��� ������ ��������� ��������� [��������� ������� + � ���� �������� ��� ����������!]
������ ���� ������� ��� ��������) �� ����� ��������, ��� ���� ������������ � ������ ������ ����� ��������, �������� �����... ��� ��� ������, ��� �� ������ �����, ������� �� ���������� ���, ����� ������� ������ � ��� �����)))) � ��� ���, ������, �� ����� ����������� � �������� ������� �� �����, � ���� ����������) � ��� ��� ��������� ������� �� ������ ������������ ������ �� ������ Pion Design.
��� ������ - ����� �������� �� ����, ��� ��� ����������� ��������� � ����. ����� � ��� ��������� ���������, ������������� ����������� � ������� � ����������! �������� blog.piondesign.se


|
��� ��������� |
��� ������ ��������� kumushki [��������� ������� + � ���� �������� ��� ����������!]
������� ��������
������ ����, ������� ���.
������� ���� �������� ��������� ��������, � ������ ���� ��� ��������� �������, ��������� ��������������. ��������� ���� ���������� �������:)
������ ������� ��� ���� �������� ������ ���� ������ ������ � �����.
�������, ���������� ������ �������� � ������ ������� �� ������ ������.
�� ���� �������, ������������� ���� �������� (������ ��������� ����) � ���� ����� ������������.

��� ������������ ��� ��� �����������
|
��� ��������� |
��� ������ ��������� ����_� [��������� ������� + � ���� �������� ��� ����������!]
������� ������ ������ � ����. ������ �����.
� ���� ������ ������ �������� ���������� � ��������, ��� ������� ������� ������ ������.
�����������:
-������� ������
-������
-�����
-����
-�����
-��������� ������
|
��� ��������� |
��� ������ ��������� ���������� [��������� ������� + � ���� �������� ��� ����������!]


http://stephaniemino.blogspot.com/2012/05/bridal-shower-card.html
http://paperpaws.blogspot.com/2011/05/doily-dress.html
�� �� ����� ������ ���� ������: http://paperpaws.blogspot.com/2012/05/doily-dress-folds-tutorial.html
Doily Dress Folds Tutorial
I've had a bunch of folks ask me how to do the folds, so I'm finally gonna do it! Yay!
Hope the following makes sense:
|
��� ��������� |
��� ������ ��������� ���������_1 [��������� ������� + � ���� �������� ��� ����������!]
|
��� ��������� |
��� ������ ��������� ��� [��������� ������� + � ���� �������� ��� ����������!]
|
��� ��������� |
��� ������ ��������� ��� [��������� ������� + � ���� �������� ��� ����������!]
|
��� ��������� |
��� ������ ��������� Tomash_Design [��������� ������� + � ���� �������� ��� ����������!]
|
��� ��������� |
��� ������ ��������� ��������� [��������� ������� + � ���� �������� ��� ����������!]
��� ������� �������� �������? � ����� ������, ������� �� ������! ��������� ��� ��������� ����, ������, ��������� ������: ����, ��� � ���� �� ������. �� ��� ����� �������� ������ � ���� ������ ������ � ��������, ��� �������� ��������. ��� ����� ������ ����� �������, ����� ����������� � �������� ����������.
|
��� ��������� |
��� ������ ��������� ��������� [��������� ������� + � ���� �������� ��� ����������!]
������ ����� �������) ������� �� ����� �� ���� ������ - �� �����, �� ��������, �� ����������� ������, �� ������� ��� ������ �������, �� ��������� ����� - � ����� ������) ����������� ������ � �������������� ����� �������. ����� ������� ��������� � ���� ���������� ��������, �� ��� ������ � ���� ��� ��� �������. ������, �������? ����������, �����, ��������....
|
��� ��������� |
��� ������ ��������� ����_������ [��������� ������� + � ���� �������� ��� ����������!]
|
��� ��������� |
��� ������ ��������� ������ [��������� ������� + � ���� �������� ��� ����������!]
|
��� ��������� |
��� ������ ��������� ��������� [��������� ������� + � ���� �������� ��� ����������!]
��������� ��� ������� �� ������ ������������� �������������� ����) ��� ������ ��� ����������� ������� ������, ���������, �������������� �����, ������ � ����. ������-����� ��� �����. ���� ����� � ����������� �����������!
|
��� ��������� |
��� ������ ��������� Juli44 [��������� ������� + � ���� �������� ��� ����������!]
�����: ������� ��������, ������������� ��������������� ��������� ����� ��������
������ http://www.mastera-rukodeliya.ru/origami/1975-reznaya-roza.html
������������ ���� ������ http://stranamasterov.ru/user/17658
����������� ������ ��� ������� �������� � ���������� ��������, ���������� 130-160 ��/�2.
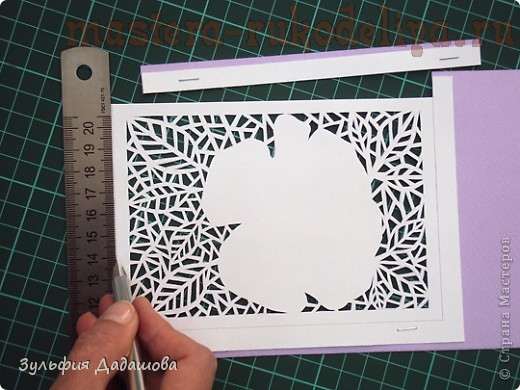
����������� ������ �� ������� ������. ������ ��������� �� ������ �4. ������� �������� �� ������� 10,5�15 �� � ��������� ����
����� �������� � ����������� ������������ � ����������, � ����� ���������� ��������� �� ������ ���������� � ������-������ ������: ������� ������ http://www.mastera-rukodeliya.ru/origami/682-ajurnyi-slonik.html
1.

2.�������� ������, �������� ���� �� 1 �� � ������ �������.

3.�������� ��������� ������ � ��������� ������. � ������� ������� ������ ������ ���� � 2 ������ ��������

4.

5.��� ������ ������������� ������� �������� ���� ��������

6.

7.�� ����� ����� ������� ������� � �������� �����

8.
������� �� ����� ������� � �������� ���� ������ ������� ��������

9.

10.��� ����������� � ������ ������ ��������� ���������� ��������� Versacolor, ���� ����������.

11.

12.�������� �� ������� ������ ������� ��������. ���������� ������� �������.
������� ��������� ������ � ������ ������ ��������

13.��������� ���� � �������� �� �������� ������������ �����

14. ��� ������

15.� ���� ������ ����������� ����� ��� � ����������� ��������� � ����������� �������. �� ������ �������� ����� � ������ �����. �� ������ �� �������� ��� ��������� ������ �����.

16.��� ���� ����� ����� ���� - � ���� �������� ������ ������������ ������, � ������� �� ����� ���� �������� ����� ��������� ������ � �� ��. ��������������.

|


