Legend
Ferumbras is about to gain godlike power and he has to be stopped.
Location
Darashia, the Dungeons of The Ruthless Seven Minions.
Dangers
Vexclaws, Hellflayers, Grimeleeches, Plaguesmiths, Phantasms, Nightmares, Hellfire Fighter, Hellhounds, Furies, Juggernauts, Destroyers, Undead Dragons, Blightwalkers, Hands of Cursed Fate, Spectres, Demons and Dark Torturers, as well as the bosses The Lord of the Lice, Plagirath, Zamulosh, Mazoran, The Shatterer, Razzagorn, Ragiaz, Tarbaz, Shulgrax, Ferumbras Soul Splinter, Ascending Ferumbras, Ferumbras Mortal Shell.
Reward
Hat Hunter Achievement, Rift Warrior Outfits, 5 Silver Tokens, Ferumbras' Teddy, 4 Folded Rift Carpets, 4 Rift Tapestries, 10 Crystal Coins. Also, the possibility to obtain Ferumbras' Hat and Mysterious Scroll from Ferumbras Mortal Shell.
(settings)
Required Equipment[]
- 30 Demonic Essences
- Dwarven Ring
- Pick, Shovel or equivalent
Recommendations[]
- Fire protection for paladins and mages
- Mana Drain Protection for mages while fighting Ferumbras Mortal Shell
- Diving Equipment while fighting Ferumbras Mortal Shell
Tips[]
- A good strategy for "low" level teams (300-400) is to gather 10 instead of 5 players for each puzzle and miniboss. With this strategy these steps should be much safer, faster and cheaper, also lowering the risk of running out of supplies. Then, when the time comes to kill the bosses the 10 players split into 2 groups of 5.
- After killing a boss, the exit teleport will send you back to the safe room before the entrance, so you don't have to worry about supplies to leave the areas as long as you reach one of the bosses.
Important Notes[]
- You may attempt to kill the bosses every two days (exactly 48 hours).
- You may attempt to kill Ferumbras every 14 days.
Method[]
Go to Darashia and find the scholar Mazarius in the northeastern part of town, here. When he asks you to help him stop Ferumbras from gaining godlike power, accept the quest.
Opening the gates of hell[]
Mazarius wants you to bring him 30 Demonic Essences. Simply give them to him by saying: Hi - Short - Yes - Demonic Essence - Yes.
Note: After a patch released on July 31, 2018 it is no longer possible to start a conversation with Mazarius if you are below level 150. That means it is impossible to gain access to the gates of hell to proceed with the quest if you do not meet the required level.
Characters that already had made access to the gates of hell prior to this are not affected by this change!
A weapon to kill a God[]
Mazarius will now hand you a Teleportation Rod. Enter the portal north of him and you'll find yourself in the dungeons of the The Ruthless Seven Minions. You are supposed to use the Teleportation Rod on all seven pieces of The Godbreaker to teleport them safely to Mazarius.
Enter the portal in Mazarius' room. First you will be in a Protection Zone and there proceed through caves fighting with Vexclaws, Hellflayers, Grimeleeches and Demons. At the end of the cave and downstairs, there is a large room with a path to portals for each of The Ruthless Seven Minions which guard the seven pieces of The Godbreaker.
Minions[]
Each way has demons to fight, a puzzle to solve, the final minion boss to defeat (with a team of up to 5 players), and then a room with a piece of The Godbreaker on which you use your Teleportation Rod.
Note: Your mission will be complete when you use the Teleportation Rod, not when you kill the boss. Thus, it's recommended that you leave the room after killing the boss quickly in order to finish the mission, and leave the loot from the boss to be taken in the Adventurers' Guild. If you linger around in the room after the boss is killed you may be teleported out of the room (if your time runs out) and you'll have to kill that boss again.
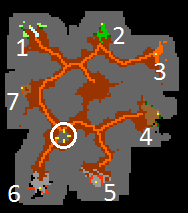
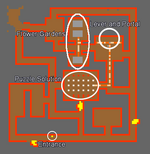
You start at the white circle.
- 1 - Grounds of Plague: Plagirath - The Lord of the Lice, Vexclaws, Hellflayers, Grimeleeches, Plaguesmiths, Defilers, and Disgusting Oozes.
- 2 - Grounds of Deceit: Zamulosh - Vexclaws, Hellflayers, Grimeleeches, Phantasms, and Nightmares.
- 3 - Grounds of Fire: Mazoran - Vexclaws, Hellflayers, Grimeleeches, Hellfire Fighter, Hellhounds, Furies, and Rage of Mazoran.
- 4 - Grounds of Destruction: Razzagorn - The Shatterer, Vexclaws, Hellflayers, Grimeleeches, Juggernauts, Destroyers, Furies, Demons, and Eruption of Destruction.
- 5 - Grounds of Undeath: Ragiaz - Vexclaws, Hellflayers, Grimeleeches, Undead Dragons, Blightwalkers, and Death Dragons.
- 6 - Grounds of Despair: Tarbaz - Vexclaws, Hellflayers, Grimeleeches, Hands of Cursed Fate, Spectres, and Guilts.
- 7 - Grounds of Damnation: Shulgrax - Vexclaws, Hellflayers, Grimeleeches, Dark Torturer, and Sin Devourers.
Verminor - Plagirath's Seal[]
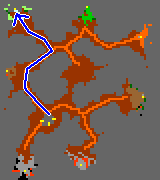
Seal entrance
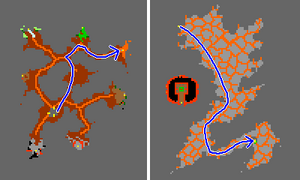
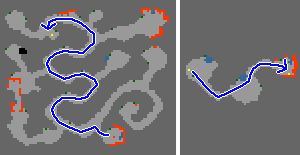
Start of by going to the Hell Hub as explained before and then follow the path to the north-western teleport as shown on the map to the right.
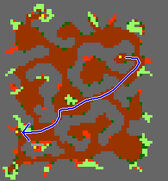
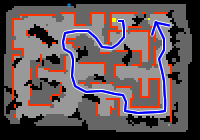
Way to The Lord of the Lice
This seal consists in just defeating a mini boss. You will start in the north-east corner, follow the path shown in the image to the teleport south-west and you'll enter a tiny room with 5 tiles and a lever. Pull the lever and your team will be teleported to the north of a big room, where you will find The Lord of the Lice to the south.
This fight is simple, just attack it and get rid of its summons, once you kill it leave the room by the south teleport.
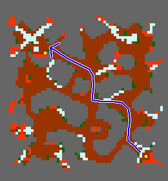
Way to Plagirath
Note: After killing The Lord of the Lice for the first time you can use this teleport here if your team plans to fight Plagirath in the future or hunt on the second floor.
Now you will appear on another floor here, make your way to the north-west and cross the teleport here to enter the lever room.
Fighting Plagirath[]

Ferumbras Ascendant - Plagirath
Plagirath will sometimes turn its target's appearance into a bog raider and when this spell runs out, all the characters within a great area (around the same size as an UE) will be hit for 1500 health, so the best strategy to make sure shooters don' take this hit is that they stay in the southeast or southwest corner of the room while the knight stands in the center, as far as possible so the druid can see him in the corner of his screen to heal him.
Furthermore, Disgusting Oozes will constantly spawn during the fight, and they wont disappear after the boss is defeated, so the safest method is to let the Knight block them and shoot only with Great Fireball Runes and diamond arrows for paladins, if an Ooze happens to target a shooter in the corner, the best idea would be that the paladin lure it to the knight and return to the corner.
After defeating Plagirath leave the room and use your Teleportation Rod on the part of The Godbreaker.
Bazir - Zamulosh's Seal[]
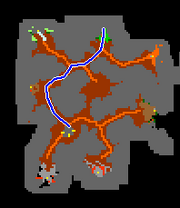
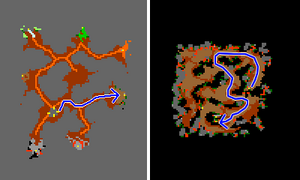
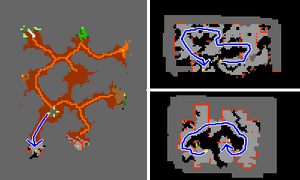
Start of by going to the Hell Hub as explained above, and then follow the path to the northern teleport, here, as shown on the map to the right.
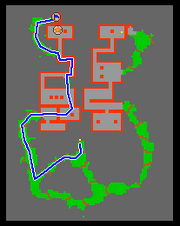
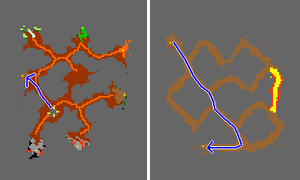
You will arrive at the southern part on the map to the left. From here you follow the blue line to the north and to the ![]() blue flag that is marked out on the picture. Here you will find a lever, that every member of the team has to pull.
blue flag that is marked out on the picture. Here you will find a lever, that every member of the team has to pull.
The following message will appear when you pull the lever:
In another room south of this one, something just made a loud booming sound.
It will only take a few seconds for the lever to reset so it can be pulled again by another player. Once everyone has pulled the lever, head south to the ![]() exclamation mark located just south of the lever. Here you will find a teleport that will take you to the next room.
exclamation mark located just south of the lever. Here you will find a teleport that will take you to the next room.
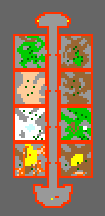
In this area you will find 8 different rooms, each one with lever that is located just outside the room's door. By pulling the levers, a monster will appear in the room and its landscape will change for a brief time to match the landscape of the monster in the opposite room. Your objective here is to bring each lonely monster to the room in front of it when its landscape matches the creature. For example, the Lonely Frazzlemaw must be lured into the room while it resembles the floor around Roshamuul, whereas the Lonely Deer must be lured into the room while it looks like a grass field with Pines.
The 8 lonely monsters encountered are Lonely Frazzlemaw, Lonely Deer, Lonely Rotworm, Lonely Scorpion, Lonely Snake, Lonely Polar Bear, Lonely Souleater, Lonely Yielothax. All of the monsters are very weak. Have a knight on the team use exeta res and lure the monster across the hall.
(Watch the video below starting at 6:00 minutes for a demonstration of this puzzle.)
Note that only one player needs to pull the lever, the challenge will count for all players inside the room when the creature enters it.
As soon as the creature enters its correct room, it will disappear. Upon success the following message will appear: That seemed correct!. Upon failure the message That seemed wrong! will appear. Don't fret if you get the failure message as the lever can be pulled again to spawn another longely monster.
Once you have done this with all 8 rooms and monsters, walk to the teleport to the south which will take you to the next room.
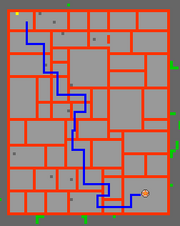
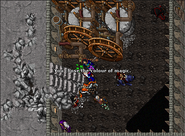
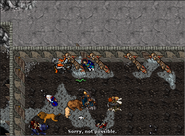
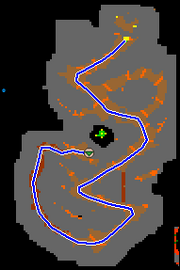
You will end up in the very north west room if this map. This area consists of many rooms with only walls, no doors. It may seem like you are stuck, however, in some places you can walk straight through the walls as shown below.
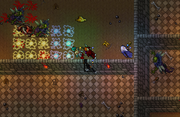
You will not be targeted by the monsters in the other rooms unless you are in the same room as them or inside the wall. Just follow the blue line marked out on the map. Once you have reached the teleport to the south-east walk into it and you will be teleported to the last room before the boss.
Stand on the five tiles and when you pull the lever you will be teleported to the boss room.
Fighting Zamulosh[]
This boss will constantly summon 1 equally strong and 5 weaker versions of himself, which will make it hard to spot the true boss. A good strategy is to stay on the corner of the room with the Knight to the front so he takes most of the summons and the boss, once there just use your best area spells/runes//ammunition until you defeat Zamulosh. The boss also uses invisibility very often which is another reason to use area attacks. If not all versions are being attacked, the team will be teleported to the center of the room. If this happens, just walk back to the corner and make sure everyone is attacking all bosses and not just one.
Once you defeat Zamulosh exit by the green teleport and use your Teleportation Rod on the part of The Godbreaker.
Infernatil - Mazoran's Seal[]
Note: This is the hardest seal by far because you have to be constantly killing Vexclaws, Hellflayers, Hellfire Fighter, Hellhounds and Furies, and the access can only be done for 3 people at a time, so if none of your team have done this access its strictly recommended that you go prepared to do it multiple times. If not done correctly or fast enough, it may also be necessary for a player to redo the steps, so extra care should be taken to make sure everyone understands what must be done.
After going down the stairs to the teleports floor, make your way to the farthest north-east teleport here and expect to face the aforementioned creatures. Once you cross the teleport you will appear here, try to stick to the walls of this place since you can get swarmed by more than 8 creatures as soon as you walk to the center. Follow the path to the stairs in the south-east here.
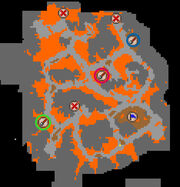
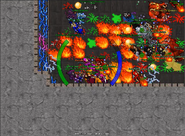
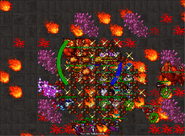
On this floor there will be 3 levers which are flooded with lava (marked with ![]() ), 3 founts (marked with
), 3 founts (marked with ![]() ) and another 3 levers close to each other that you will be using at the end (marked with
) and another 3 levers close to each other that you will be using at the end (marked with ![]() ). The 3 founts have a coloured tile next to them, once a player steps on the tile the fount will fill with lava, the lava of one of the flooded levers will drain for a limited time and the player will receive a message with a combination of colors that must be written down (you can still use your combination if you fail and come back later).
). The 3 founts have a coloured tile next to them, once a player steps on the tile the fount will fill with lava, the lava of one of the flooded levers will drain for a limited time and the player will receive a message with a combination of colors that must be written down (you can still use your combination if you fail and come back later).
You hear a whisper: 'You will not be guided but your path shines in the colours green, blue and red. Heed this hierarchy.
All the 3 coloured tiles must be stepped so all 3 flooded levers can be accessed, these levers are marked in the image with the red, green and blue circles and they must be used in order given by the message received by each player. After you use the last lever you will receive a message with an element, either blood, ice or grass.
A booming sound almost deafens you. From somewhere deep within you hear a whisper: 'Ice...'
Once everyone has its corresponding element assigned, head to the flag ![]() mark near the stairs and you will see the last 3 levers, each one has a tile next to them with ice, blood and grass, step on the tile south of the lever of your corresponding element and pull it to enter the room with the boss lever.
mark near the stairs and you will see the last 3 levers, each one has a tile next to them with ice, blood and grass, step on the tile south of the lever of your corresponding element and pull it to enter the room with the boss lever.
Note: Once the lava in the lever pools drains it will take around 5 minutes for it to flood again, if you happen to be inside the pool when it floods again, you will be teleported to the center of this floor, probably with most of the creatures respawned, so be careful with this timing! Note²: If a player pulls the levers in the wrong order, he will have to step in one of the coloured tiles again and get a new colour sequence, which may or may not be the same as the previous one.
Fighting Mazoran[]
This boss is ironically one of the easiest of this quest, the blocker just has to take it to the southern part of the room and the shooters stick to the wall, every few minutes the floor will turn into lava (which deals 1500 Fire Damage if you walk on it) and 5 Rages of Mazoran will spawn. Avoid walking when the floor is lava, the summons will die fast with some area attacks. If necessary they can be passed to a blocker after the Lava disappears since it should be safe to walk for a minute or so.
After defeating Mazoran leave the room and use your Teleportation Rod on the part of The Godbreaker.
Apocalypse - Razzagorn's Seal[]
This seal is quite similar to Plagirath's one, you have to kill a mini boss at least once to get access to his room, but this one is more difficult.
Make your way to the teleport to the seal, and once inside take a lot of care because as you approach to the center of the big rooms you can be easily swarmed by many Juggernauts, Vexclaws, Grimeleeches, and Hellflayers.
Follow the path shown in the image to the flag ![]() mark and you will enter in a tiny room with 5 tiles and a lever.
mark and you will enter in a tiny room with 5 tiles and a lever.
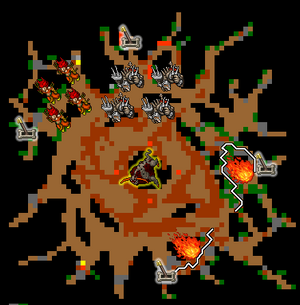
In the middle of the next room you will find The Fettered Shatterer and in order to release him 4 levers must be pulled.

Ferumbras Ascendant - The Shatterer
The north one is guarded by 4 Destroyers, the west one is guarded by 4 Furies and the paths to the south and east ones are obstructed by rocks and hidden with fire fields (the paths are shown as white lines on the image below). Once all levers are pulled, the 4 chains locking The Shatterer should disappear. If they don't, just walk around the corresponding lever again. Notice that when you pull the levers hidden by Fire, the Fire should also disappear allowing you to see the path.
Now you can slay The Shatterer. The shooters should just stand diagonally and keep a certain distance from the boss to avoid his waves and explosion. Beware that as soon as it dies the team will be teleported to the next room in which you will find the same creatures you did before.
Note: After killing The Shatterer for the first time you can use this teleport here if your team plans to fight Razzagorn again in the future.
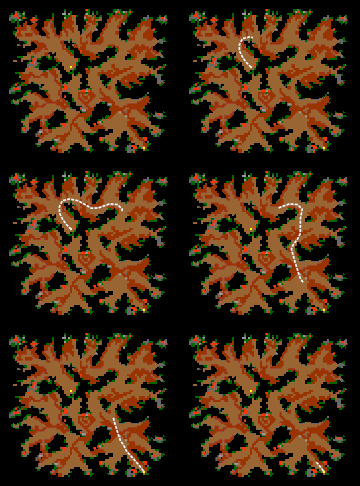
Now just follow the path to the flag ![]() mark to enter the main boss lever room, stick to the edges of this path and take care of not luring many monster from the center of the rooms as you advance.
mark to enter the main boss lever room, stick to the edges of this path and take care of not luring many monster from the center of the rooms as you advance.
Fighting Razzagorn[]
After pulling the lever, players will be brought to a room with Razzagorn and 4 Demons, which can be spread across the room. The team can stay to the west of the room to avoid the Demons from the east from rejoining the fight after respawning. The whole boss room will spark a Paralyze spell every once in a while.

Ferumbras Ascendant - Razzagorn
Notice how the shooters always start attacking the Eruption as soon as it spawns - even when a Demon or the boss has very low health.
During the whole fight, Eruptions of Destruction will be summoned by the boss. When they spawn, players should focus and kill it as fast as possible. Failing to kill it within 8 seconds will cause it to explode, dealing up to 2,500 damage (split between different types, Energy Damage, Fire Damage, Physical Damage, and Mana Drain), heal the boss for 11,500~19,500, and spawn another Demon. Only Focus on Razzagorn when there are no Eruptions alive.
After defeating Razzagorn leave the room and use your Teleportation Rod on the part of The Godbreaker.
Ashfalor - Ragiaz's Seal[]
Note: Mages should bring Thunderstorm Runes for this part as well since they are more effective on the way to the boss.
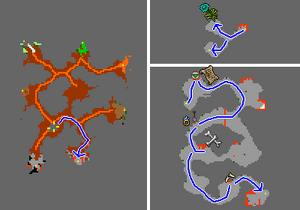
Start by going to the south-east teleport as indicated. Now, you'll have to follow the path south, but during this path you will also have to pick up some items you will need for a ritual, as shown on the map.
- On the small room after the teleport, pick up a Grave Flower
 from the one planted on the floor. Every player must take one, it respawns after approximately 30 seconds. There are multiple Flowers on the area, as shown on the map.
 - Go down the hole and then go down again to the north, where you'll find The Rite of Eternal Night
 .
. - Continue following the path until you find a small white tombstone. Use a Shovel or secret agent tool in front of it to receive the House Silversun's Signet Ring
 .
. - South-east of that, you'll find two coffins. Use the one with the blue flower on top to find Bones
 .
. - Head south where you will find some ashes. Use the ashes to find Vampire Teeth
 .
.
With all items in possession, go down the hole, this is a safe area. Each player will have to perform the ritual once, so some patience is required here. The ritual consists of the following steps:
- Use each one of the items (


 ), with the exception of the sheet, on the south-east corner of the Dried Well.
 - Turn off the torch of the statue just north-west of the Dried Well.
- Walk back to the Dried Well and use The Rite of Eternal Night. Blood must start flowing from the well, and you'll be granted access to the next area.
You may now enter the gate to the north and follow the path to the lever room.
Fighting Ragiaz[]
Together with Ragiaz, there will be 4 Death Dragons in the room. The Death Dragons respawn immediately after being killed, so killing them is futile. From time to time, Ragiaz will transform into a Bone Capsule, which is an immobile cocoon. You have to kill the cocoon as fast as possible, because the longer it stays alive, more health Ragiaz will recover. Once the Bone Capsule is destroyed, Ragiaz will reappear at the center of the room. There are three methods of executing this fight:
- The first and simpler method is simply to block all 4 Death Dragons and Ragiaz at the same time. This can be very dangerous depending on the level of the blocker(s), however. A level 350+ Knight with two druids should be sufficient, but if in doubt the second method can be used.
- The second method consists of trapping the Death Dragons on the northern part of the room, using Wild Growths. It's recommended to do this when the Bone Capsule appears for the first time, so the blocker and 2-3 mages can go north to trap the Death Dragons while the other shooters remain attacking the cocoon.
- Finally, if the team has 2 blockers one of them can take the 4 Death Dragons and stay away from Ragiaz. This is only recommended, however, if the shooters have high fire power (all level 350+?), because there will only be 4 players attacking the boss and the fight will require more time.
Regardless of the method, it's important that the team executes the strategy quickly and efficiently, as the team might fail to finish the boss in time and be kicked out of the room.
Pumin - Tarbaz's Seal[]
Follow the path south-west of the stairs and enter the teleport, then follow the map to the right to reach the puzzle area.
This puzzle is an easy one and there won't be any creatures while you go through it. Your objective here is to help the NPC ... discover his name, and to do that you'll have to find clues to the 5 letters around these ruins. You can track your progress in the Quest Log. Walking around this place will be difficult as some fields are invisible on the map and also have an extremely low walking speed. Just be patient and find the right passages.
The maps below show all the locations you will have to go in order to find the five letters:
First letter:
Go to the room north-west and enter this room through the room south of it. Inside it you will find a lever, which all players must pull to receive a matching color and "element" (Blood, Decay, Magic, or Clay).
Now go up the stairs by the lever and walk south. In here you'll have to walk through a labyrinth of invisible walls (you'll have to take a lot of diagonal steps). If may be possible to distinguish the walkable and non-walkable tiles if you adjust your graphics settings, they have slightly different colors. At the end of the labyrinth, pull the lever that is related to your element. From left to right: 1st = Blood, 2nd (Slime) = Decay, 3rd (Mana) = Magic, 4th (Mud) = Clay. Note that even if you don't know your color, you should be able to proceed by trying all of them until one works.
Second letter:
Go back to the main area and then go to the room north-east with some animals in it. They won't cause damage to you but have a lot more HP than the regular creatures. Do not kill them, you need them alive! Between the first and second totem, use the wall to pick up a Bone Flute.
You have to use the Bone Flute in your corresponding animal a few times. If you use on the wrong animal, a red message will appear saying it's not the animal of your spirit. When using on the correct animal it should make a different sound. Note that it may take several uses on the right animal until it works. You'll know you have succeeded when your flute disappears and your Quest Log is updated.
Third Letter:
Now you'll need a Fire Bug. You can take one from a chest on the north-west corner of the room just north of the NPC ..., here. Then, go to the room on the east side of the ruins and light one of the Basins there to receive a Quest Log update.
Fourth Letter:
Before proceeding, make sure all Fire Basins in the northern room are lit. Go to the room to the south where you'll find some Bookcases. Move the Pendulum Clock next to the Bookcase near the door and them use the sign that was hidden by it. If your quest log doesn't update when using the sign, take one step south and it should work (you'll see a light effect on yourself and receive another quest log update).
Fifth letter:
Keep going south and go up the ladder. Find your way to the north in this maze with several false doors. Use the sign on the wall here as shown below and you'll find the last letter.
Note: After finding all 5 letters of the NPC's name, the entries will disappear from your quest log, which is normal. Don't worry and just proceed to the last part.
To complete the puzzle, you'll have to lure the Desperate Soul (a white rabbit your have probably seen around already) to the room with NPC ... to the south-west. The Desperate Soul will disappear when it finds its owner, and now you can talk to .... Say hi, mission and then his name, tevon. Now go to the north room to continue your path towards the boss down the ladder here.
Follow the map to the right around the ruins and you'll reach the room with the lever.
Fighting Tarbaz[]

Ferumbras Ascendant - Tarbaz
Inside this room you will find 4 Guilts, but they don't move. Avoid the center of the room since they have ranged attacks and stay near one of the corners to minimize the damage taken from them. Tarbaz itself is not very strong, so you should just attack it. Eventually during the fight the team will be teleported to another room. In this room the movement speed of all characters will be extremely slow, so be patient and start following the path, avoiding the melee range of the Guilts here. You will find 4 Despairs on your way which you have to kill to be able to proceed. At the end of the path, enter the teleport to return to the room with Tarbaz.
Note: The main reason of failure here is simply due to lack of time. Thus, do not waste time during this fight and do things quickly. Shooters should start attacking the Despairs as soon as they get in range.
After killing the boss, go into the teleport and use your Teleportation Rod in the part of The Godbreaker.
Tafariel - Shulgrax's Seal[]
This is one of the easiest seals since both the puzzle and boss are relatively easy and safe. Start by going to the eastern teleport, then following the path south-east and going down the stairs. Since there are many creatures on the way, you can use energy walls/bombs to ward them off from the corridors you won't cross.
The next floor has a big area and the puzzle. Start by going west then north.
Note: When you reach the puzzle solution area with metal tiles, do not step on them. If you do that randomly you may have to wait until they reset (10 minutes) to assemble the correct puzzle solution.
Take the door east, then go north and west to the Puzzle Garden. Here, you'll find three different gardens with Blue, Red and Yellow roses:
You can take a screenshot or write down the position of all flowers since they are the solution to the puzzle. Another strategy is to split the team and then tell each other the positions of the flowers.
To solve the puzzle, you have to match the colors of the tiles to the south with the flowers in their respective square. In order to properly see the colors of the tiles, you have to either turn on Show Light Effects and reduce the Ambient Light (Options > Graphics > Effects) and unequip any light-emitting equipment. You can also check using your minimap because the tiles will also change colors there, as shown below.
Since you cannot reset a tile back to white, if you step on a tile that should be neutral you'll have to wait until the puzzle resets and check the flowers positions again.
After setting the tiles correctly, you will have 10 minutes to pull the lever and enter the gate to the lever room before the boss (each player needs to pull the lever once). After 10 minutes, the flower pattern will be generated anew.
Fighting Shulgrax[]

Ferumbras Ascendant - Shulgrax
At the start of the fight and every few minutes the boss will spawn around 5 Sin Devourers and 3-4 Damned Souls. The Sin Devourers will paralyze you and cast spells that reduce skills and magic level drastically. The Damned Souls will run away from you and will turn into a Purified Soul ![]() when they get slain, which must be used on the Sin Devourers to make them disappear. It is recommended that the weakest shooter of the team does this work, but if a Sin Devourer targets him, its paralyze will make it harder because the crystals expire in 5 seconds. Either way, it's important that one shooter keeps doing this part while the rest of the team focuses on the boss.
when they get slain, which must be used on the Sin Devourers to make them disappear. It is recommended that the weakest shooter of the team does this work, but if a Sin Devourer targets him, its paralyze will make it harder because the crystals expire in 5 seconds. Either way, it's important that one shooter keeps doing this part while the rest of the team focuses on the boss.
The Druid healing the blocker can position himself further away from the center of the room near a wall, this way the Sin Devourers will mostly target the other shooters lowering the risk of death for the blocker due to weak healings.
After you defeating the Shulgrax use your Teleportation Rod on the part of The Godbreaker.
Ferumbras[]
Note¹: It's essential that the team brings Convince Creature Runes for the fight, since they are required during the third stage. Two runes per player should be more than enough.
Note²: It's recommended that all players wear Diving Equipment and Mana Drain protection since those two damage sources are quite significant during the fight.
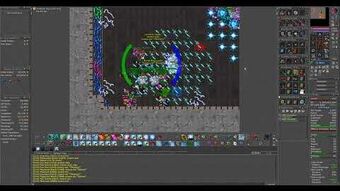
Ferumbras Ascendant - Final Boss
First stage: 00:30
Second stage: 07:00
Third stage: 12:00
Fourth stage: 13:25
After teleporting all seven pieces of the The Godbreaker, the last portal will return you to Mazarius' room, where he can not be found anymore. You learn that you have been betrayed, Mazarius was working for Variphor and stole the Godbreaker pieces. A new portal in his room now takes you to the Halls of Ascension. At the entrance, you will find the Demonic Messenger, that gives you tips into how to stop Ferumbras ritual of ascension.
From here, the path will be filled with foes. Keep going north while fighting, and go down a hole at the end of the path. Go east and upstairs. Move all the way south, then go downstairs. Move west and, in the first room, take the corridor south, continuing until you find stairs going down again. This is an "8" shaped room, choose your path all the way north and you will find a portal to the lever room of the final fight. There are spots for 15 players to fight the Ascending Ferumbras.
The Ascending Ferumbras cannot be killed, so don't bother with it at first. You'll also find Enthralled Demons, which you'll have to block since they immediately respawn, and Rift Invaders which are necessary for the fight. Also mind that the energy sources around the walls will also attack players.
First Stage: Crystals[]
Eight blue crystal structures surround Ferumbras. The Rift Invaders must be killed adjacent to the crystals in order to destroy them, which happens when it changes to a pink color. They spawn at the north part of the room, so the blockers should lure from that area specially for the southern crystals. The common strategy is to leave the south pillar to the west last in order to prepare the team for the next stage.
Once all crystals but one have been destroyed, the team must gather in a corner near the remaining crystal and destroy it from distance.
Second Stage: Ferumbras Soul Splinters[]
As soon as the last crystal is destroyed, eight Ferumbras Soul Splinters will appear. If the team has correctly positioned in a corner, only 2-4 Soul Splinters will be in range of the team. Since they summon regular Demons and deal considerable damage, it's much safer to lure them slowly. Kill them one by one using single-target attacks to quickly reduce the damage taken by the team.
Each defeated Splinter will become a Ferumbras Essence, which is harmless. Once all Splinters are dead, you should proceed to the next step.
Third Stage: Rift Fragments[]
Note: This is the stage where creatures deal Drown Damage and Depth Galea or Helmet of the Deep is recommended.
Ferumbras will now have become Destabilized Ferumbras, but this form cannot simply be killed yet. Lure the Ferumbras Essence onto the vortexes left behind by the Rift Invaders, so they disappear. After all Essences have been dealt with, Rift Fragments will spawn to the north. They must be convinced by players, since they will do most of the damage to Destabilized Ferumbras. It's recommended that Druids stay near them and use Mass Healing to recover their health (and also damage the boss). With the help of the Rift Fragments, Destabilized Ferumbras should die quickly.
Fourth Stage: Ferumbras Mortal Shell[]
Once Destabilized Ferumbras is defeated, he becomes Ferumbras Mortal Shell which is the final stage. The Mortal Shell must simply be attacked. Since it's strong against Death Damage, other elements may be more suitable.
After the final defeat, use the portal in the south side of the room to exit to the reward room with NPC Heavenly Messenger. Say hi to him to receive your Rift Warrior Outfits and the Hat Hunter Achievement.


