While on Feros you found the personal log of an ExoGeni employee. The doctor's notes seem to express some concern about samples they provided to a group he referred to only as Cerberus.
Alternative journal entry:
The colonists of this world in the Matano System are the victims of a horrible mutation that has transformed them into mindless creatures.
Acquisition[]
This assignment can be first obtained from a server node in the upper level of the ExoGeni headquarters on Feros (average decryption). The terminal is located next to the PSI controls used to sever the Geth Dropship's claw; you need at least 5 points in Decryption to unlock it. When you access this node the assignment will first be called Investigate Samples, and the terminal text reads as follows:
“PRIVATE LOG OF DR. GAMORLE
"I don't trust this Cerberus group. They may pay us well, but if this gets out before we've developed an antidote... it's just not smart. They won't tell us what they want the samples for or why they wanted them delivered to the Matano system. My records show nothing of interest there."”
The personal log points you to the Matano system of the Maroon Sea cluster, and you need to go to the only planet you can land on: Chasca. On approach to one of the colony structures southwest from the Mako drop zone your squadmates wonder where everyone is and express their unease. The assignment name then changes to UNC: Colony of the Dead.
If you didn't decrypt the server node on Feros you can still gain this assignment simply by deploying to Chasca and reaching any of the aforementioned buildings. It is added to the journal proper when your squadmates start commenting.
Preparation[]
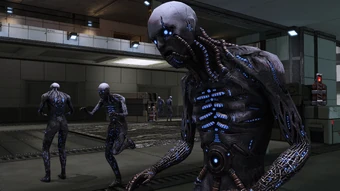
Since all the fighting in this assignment will involve groups of Husks, consider bringing physics-based biotic attacks, Neural Shock, and shotguns with Hammerhead Rounds or Sledgehammer Rounds to keep them off their feet. Fighting is mostly done inside the prefab structures.
The electrical discharge attacks of Husks are tech-based, so anything that boosts hardening or tech protection stats will greatly reduce damage from them. Light armors and armor upgrades such as the Combat Exoskeleton reduce damage from the overloads, however damage protection stats and abilities such as Immunity do not. Tip: When you see a Husk starting its electrical burst attack, if you immediately knock the husk off its feet by any means the attack will do no damage even though the burst effect animation does play.
Walkthrough[]
A seemingly deserted colony in the middle of nowhere is not what it seems. Something happened to its inhabitants.
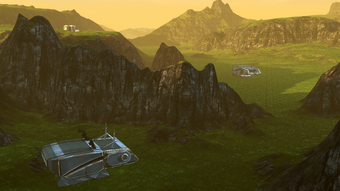
There are two civilian structures and a research base to the southwest of your landing zone. The two civilian structures are on the flats and the base is on the plateau above them. They were originally used by a colonial pioneer team, but the colony has fallen out of contact. Approach any of the three structures and as you get close, one of your squadmates will comment on the obvious absence of its inhabitants. The other will always respond by saying "I have a bad feeling about this."
The buildings have dragon's teeth standing near them, so you can probably guess what you will be facing: the research base and perhaps one of the two civilian structures will have Husks outside it while the other will be deserted save for the odd corpse littering the ground. Once you have cleared the outside of the structure being approached of any loitering Husk, head inside.
No matter what structure you enter you will encounter around 10 Husks in each building. Any structure can be approached and cleared in any order, though you only need to explore the science facility to complete the assignment.
Southern Civilian Structure[]
The southern structure has 3 Husks waiting on the outside. You may want to disintegrate them before they reach your Mako as their blast ability takes out a significant chunk of shields.
Inside, you arrive at an empty antechamber so you can switch loadouts in peace. Beyond in the main area are a bunch of Husks on the ground and second floor; they'll all bear down on your position once they're alerted to your presence. If you've been on a couple of Uncharted assignments you'll find the layout may be glaringly familiar. There are a lot of containment cells and fusion containment cells in the room: if you can bait a husk to prematurely detonate its electrical ability near these cells, the chain explosion may be enough to wipe out their shields (or heavily damage them at lower difficulties). Take out the Husks before they get too close as their claws are still deadly.
The side rooms in this structure are locked and inaccessible. The lower level has a Malfunctioning Object right next to the entrance, a Crate and a Locked Crate (easy decryption) next to each other near the farthest pillar from the entrance, a Sludge Canister in the far southwest corner directly in line with the entrance door, and a Crate near the stairs going to the upper level. The upper level contains two Aid Stations (giving two medi-gel apiece), a Weapons Locker (easy decryption), and an Upgrade Kit that can be accessed by mounting the boxes on the left past the weapons locker. Once you have everything, head out.
Northern Civilian Structure[]
The northern structure has no enemies outside, though your Mako's radar may pick up the ones around the nearby science facility.
This building's interior will again have about 10 Husks and the cover is different. It is a lot more cluttered with man-size crates and obstacles, meaning greatly reduced visibility and more chances to be caught in the backwash of a Husk electrical attack. Pay close attention to your radar and if necessary let them funnel into the antechamber where you can pick them off a few at a time.
As with the other civilian structure, the side rooms are locked and inaccessible. The lower level has a Crate in the back right corner opposite the entrance door and an Aid Station along the left wall. The upper level contains a Wetware kit, an Upgrade Kit, and three Storage Lockers (all easy decryption).
Science Facility[]
Up on the plateau the science facility exterior has 3 Husks, a couple of corpses, and a lot of dragon's teeth.
The interior follows an underground facility layout: antechamber, main room, two back rooms and a tunnels and doors system to connect them. The antechamber has no lootables, so head into the main hold and take out the Husks there. Crates obstruct the view of the main area from the entrance, though past them are passable vantage points to the rest of the room. Make sure they don't get near you and backpedal into the entry room if you need to. If you need it, there's a Medical Kit on one of the four pillars (upper right going by your map). If you become disoriented in the main room, remember that the way out has four crates of plants (two on each side) while the way deeper into the facility has only two crates of plants on one side.
The back room to the left is completely empty. Follow the exclamation point on your radar to the opposite chamber: in this room are a Technician Kit, a Locked Crate (easy decryption), a Wetware Kit, a Secure Weapon Locker (average decryption), and a Malfunctioning Object. Accessing the terminal will reveal that the entire pioneer team is dead, and whatever 'samples' were provided to Cerberus (possibly referring to the dragon's teeth scattered around), they effectively killed all the colonists.
Acquiring this information updates your journal and ends the assignment. You can still explore and clear the other buildings if you went here first.
Enemies[]
Trivia[]
- In the final room of the Science Station, the easy decryption Locked Crate can give unlimited loot and XP. Simply open and loot the crate, then save your game and reload, and the crate is unlockable again with new items. This can be done an unlimited number of times with varying loot each time, and compared to the mission-locked unlimited loot crate on Feros this can be visited an unlimited number of times. On higher player levels, and especially on Mass Effect Legendary Edition where there is no Pinnacle Station: Convoy for item shipments, the loot is more valuable, with some of the highest-ranked armors in the game being obtainable from this crate.
- The southern structure uses the same interior layout as the Amaranthine base in UNC: Hostile Takeover, the Sharjila base in UNC: Asari Diplomacy, and the Xawin base in UNC: Privateers.


