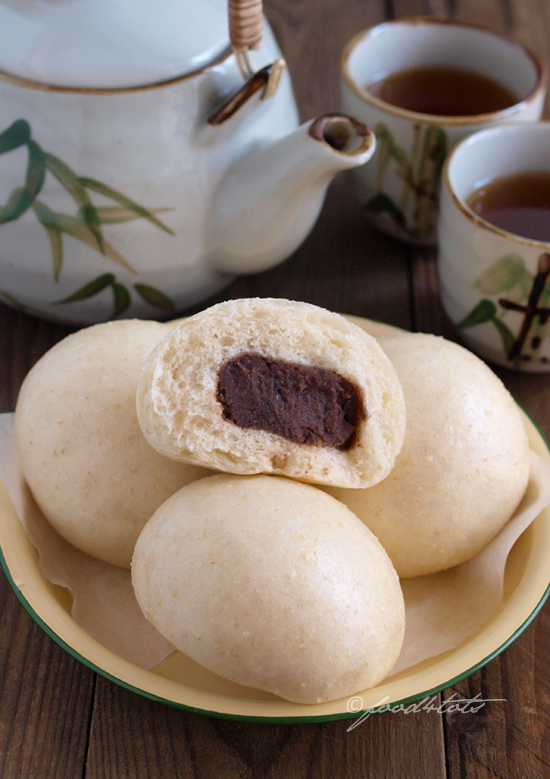
Wholemeal Pau with Red Bean Filling
I love eating Chinese steamed buns (pau) as much as I love making them. Making pau is a lot easier and quicker than baking bread. I can even knead it by hand. But, I must confess that mastering the skill is not easy. After spending months in making pau, I still couldn’t get a batch of completely “wrinkle-free” pau, no matter how much care and attention I put into kneading, proofing and steaming them. In my case, “practice does not always make perfect”. I kept wondering whether I have overlooked something. So, I read through some cookbooks and searched the internet, trying every possible way to find the cause. Recently, I got the answer from one of my favourite cookbooks. I’m thrilled that I finally nailed it and learned something new as well.
It was actually the uneven steam pressure in the steamer that caused the ugly surface of my pau. I had used high heat to steam my pau and this led to a spike in the pressure inside the steamer that resulted in the pau expanding too fast and over-extended. After the steaming was done, the drop in temperature inside the steamer made the over-expanded pau failing to hold its shape and thus collapse. This scenario usually occurs when the home use steaming apparatus is comparatively small and is unable to cope with the high heat coming from the gas stove. To rectify this problem, I started off the steaming with cold water on medium heat and reduced it to medium low once the water started boiling. Five minutes before ending the steaming process, I lifted the lid slightly creating a tiny gap to release some of the steam pressure and to maintain an even pressure within the steamer. With all these adjustments, my entire batch of pau turned out to have smooth surfaces!
This pau recipe that I share with you is a basic pau recipe that you can make it with or without filling. The wholemeal flour that I added is just my personal choice to make the pau a bit healthier. The recipe still works if you use solely pau flour or plain flour. For filling, I used my homemade red bean paste. But, if you don’t want to do it from scratch, you can opt for ready-made red bean paste. If you do so, you may need a lesser amount than what I recommended in the recipe as the read-made paste is usually overly sweet. Besides that, you are also free to use any filling of your choice, be it sweet or savoury. Alternatively, you can also add some dried fruits, seeds and nuts, and then shape it like mantao. The choice is endless. Have fun!
>> Get the recipe and step by step tutorial at PAGE 2 BELOW.
If you like this article, please share:


wow those buns are so perfect!
Much healthier being wholemeal 🙂 These red bean buns are good for breakfast, snack, even supper!
Tigerfish: I usually made them after dinner and will definitely eat one as supper. Just can’t resist the temptation! 🙂
Home-made paus are healthier than store bought if you can get hold of a good dough recipe. Your paus look good. Very even and smooth surface.
Kimmy: Thank you for your lovely comment. Do give it a try! 🙂
Just a question; the pau flour is always all purpose or whole wheat flour is it? Not rice flour? Can I use rice flour? I had these once in Singapore and they out of the world n have been wanting to make it at home. Thank you for the recipe n please do tell me if I can use rice flour!
Hannah: Pau flour is a special type of low protein flour for making Chinese bao (pau). You can substitute it (partly or fully) with cake flour (low protein), all purpose flour (medium protein) or whole wheat flour (high protein). However, please remember that the higher the level of protein, the harder the texture of the pau. Rice flour is non-gluten. So sorry that I can’t comment on that as I haven’t tried it before. 🙂
Hii….i trid yr resipi nnit turns out super satisfying. Tq for sharing.
Hasnah Wong: Thank you for your super good feedback! 🙂
Hello! Great to chance upon your website~!
Can I ask how come we don’t need to proof the dough for an hour? I read some other recipes and they require that. Will it make a difference to the pau texture after steaming?
🙂
Rezz: Thank you. Making Chinese pau is different than making bread. If you proof the dough for too long, the steamed pau will have lots of air bubbles which may affect its appearance. That’s what I understand from a Youtube video but I haven’t tried it out myself. I had tried proofing a portion of the dough for an hour and mixed it with the rest of the ingredients. This is similar to sponge dough method. The texture is more refined and we can cut down a bit of the rising agents used. 🙂
Home-made paus are more beneficial than locally acquired on the off chance that you can get hold of a decent better recipe. Your paus look great. Even and smooth surface.
Mukesh: Thanks for your wonderful compliment! 🙂
How long can u keep the buns in the fridge ?
Nicole: Around 1-2 days. For longer period (1 week), put inside the freezer. 🙂
Yong: Thanks for your wonderful compliments! Do give it a try and share your feedback! 🙂
The recipe and your instructions are superb! Made pau for the first time today. It turned out well! For filling, I used sweet potato (main) with some shredded coconuts (leftover after making santan). Thank you for sharing your knowledge and experience!