Moving Day has arrived!
Recently, I made the decision to move all of my blog content from Blogger and begin blogging on the WordPress platform. There are several reasons, but one very important one is that I want the best way possible to share FREE PDF graphic files with my readers, a function not available through Blogger without using an outside file sharing source.
This process has taught me that Blogger was designed for blogging and blogging only, it’s simpler and a bit more user friendly than Wordpress, (so please bear with me as I learn my way around.) Wordpress, however, is so much more than just a blog. It’s used by many as a content management system. It’s extremely customizable and allows users to grow their blogs into fully functional websites.
I believe my current followers have automatically moved with me... but just in case they didn’t please resubscribe at http://justsomethingimade.com/feed/
The tedious move was not done by me. Desirai Labrada of Desirai.com made every single bit of the details come together into the fabulous new website. I supplied the graphics and a few notes and she and her team worked very hard giving special attention to every last detail of the transfer, new blog and design. Please contact Desirai if you are looking into starting a new blog, modifying your current blog or considering a move to a new platform altogether. She’s more than happy to answer all your questions and is prepared to hold your hand through every step of the process.
Thanks Desirai!!
Thursday, September 30, 2010
Monday, September 27, 2010
Blog Dancing
I found a darling little antique flip book at a rummage sale over the weekend for $1.50. I scanned each individual page and using Photoshop animation, created a fun freebie for your blog’s sidebar.
Click on either size (200 px wide or 150px wide) to open in a new window and copy the URL at the top of your browser window. Add a gadget to your blog by placing as an image using the URL.
More JSIM animations from the past:
• Animals
• Your Comments Make Me Happy
• Cuckoo Clock
• Practice Patience
• Jump Toss Turn
• I’d Rather be Blogging
Saturday, September 25, 2010
A Father-Daughter Moment
Where does the time go? Last night Jeff and Sarah attended a father-daughter dinner at church, so they both dressed up so sweet. I just can’t believe how fast my youngest is becoming a young woman. I was able to snap a few shots before they raced out the door.
Sarah wore her great-grandmother’s pearl earrings and my long string of Lisa Leonard cream freshwater pearl necklace wrapped twice. She looked like a princess. Pardon me while I glow.
Friday, September 24, 2010
Flea Market Ephemera
Last Sunday was the last big flea market of the summer in Santa Rosa, CA. It was slim pickin’s as many sellers stayed home due to the heavy drizzle/light rain. But I was still able to find a few paper treasures to share with you for your vintage collages and other crafty projects! After scanning, I took a few of the images into Photoshop to remove any handwriting so you can personalize them yourself. Just click on each image to enlarge, save and enjoy!
Tuesday, September 21, 2010
Decorative Chess Sets
Last week, I turned a $2 second-hand cabinet door (from the recycle area of the county dump) and a garage-sale box of wooden chess pieces for $1.50 into... a cool and colorful chess set for our family room. It was crazy simple!
I cleaned up the board and spray painted it in a color to coordinate with the marbled paper. I used the images that I posted HERE to create the checker-board pattern and end pieces. I’m including them here for you to download and size for your own set if you like these colors. (Of course if you know how to use Photoshop well, you can change the colors to suit your own decor.) Simply print to size two copies of the board pattern halves and one copy of the end pieces and trim out with a craft knife. I used spray adhesive to mount my paper to the board beginning by butting the two checkered pieces together in the middle and then adding the end pieces. I then sprayed the entire piece with clear matte acrylic.
HAPPY ACCIDENT: I chose the same blue-green spray paint color as I used for the board for one set of chess pieces, and a dark red for the other. After spraying them all outside, I went back into my studio to work. Looking out the window I realized the wet pieces had blown completely off their paint surface, into one another and onto the ground. After picking grass and dirt out of the paint, I found they actually looked pretty cool roughed up with random paint spots! I love when that stuff happens, but it helps to keep a good attitude, because I do know how some crafting mistakes can be stressful.This isn’t all I have to offer in the way of ideas for chess sets- please read my latest commissioned post over at SC Johnson’s Family Economics HERE!
Thursday, September 16, 2010
Making it Big
See how much fun you can have blowing things up around the house- check out my post at SC Johnson Family Economics on enlarging simple little things to create a bit of silliness in your decor!
Wednesday, September 15, 2010
ecosystem Notebook: Review & Giveaway
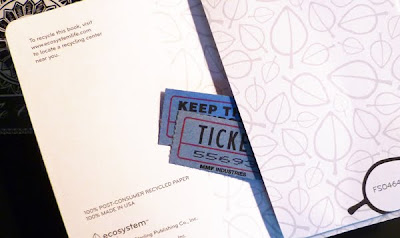
Recently, I was asked to be a part of the ecosystem Summer Challenge. They offered to send me a sketchbook to use for at least 30 days and share how I made it my own. Free sketchbook? Twist my arm! When it arrived, I had to laugh, because it is the EXACT sketchbook I had found at the bookstore weeks earlier and was LOVING! What a score- now I have two!!I didn’t know anything about ecosystem until they contacted me, but after spending a bit of time on their website, you too will be quite impressed with their commitment to earth-friendly practices.
Here’s where it gets fun- you can build your own custom ecosystem notebook online, starting at $9.95. They offer small, medium and large, several great colors, choice of cover stock and different page options: blank, ruled, grid, or in planner form. There are also insert features and custom ordering options. My ecosystem notebook pick was small, black, blank. I haven’t altered or embellished it, I keep things pretty simple for my everyday sketchbook and this one is petite but beefy and tucks right into my small purse or tote. And because I’m always cramming it into a bag, the elastic band feature is awesome as it keeps my pages snug and neatly together as to not be crumpled by other objects. There’s even a pocket in the back of each book for tucking items into. I keep small random bits of ephemera I find in mine.I’ve gone through so many sketchbooks over time and by far this is my favorite, freebie or not! Beautifully smooth pages, not too heavyweight, just right.I fill mine with ideas for crafts and blogging as well as full page doodles. I’m a big doodler, especially in church. It’s how I listen best.And, get this, the awesome folks at ecosystem are offering a giveaway of one ecosystem notebook to each of THREE JSIM readers!
TO ENTER: Please visit the ecosystem website and leave a comment on this post of how you would build your custom notebook { 1. Style...2. Cover...3. Size...4. Color } or leave a notebook-related message. It’s that simple. One entry per person, please. Be certain to leave a way for me to find you if you win!
ENTRY DEADLINE: Midnight Friday, September 17, 2010. Winners will be randomly chosen and announced on the following Sunday.
To follow the great things happening at you can follow them on TWITTER or FACEBOOK!
UPDATE:
Thank you for all the great entries and nice words! The winners of the notebooks are:
Dianamc, Joy of Sonoma and Nell. All winners have been contacted.
Friday, September 10, 2010
Cheater Cards: Personalized Stationery
So, yeah, sometimes I cheat. Sorta.See my latest post over at SC Johnson to see how I transform discount store-bought stationery into lovely custom note cards.
Vintage Baggage/Luggage Tags: Free Digital Images
Since my post yesterday, I’ve had old tags on my mind and found this one today at an antique shop. It’s from American President Lines, Your American Hotel Abroad. I’ve never actually been on a cruise, but my vintage storage luggage can still look like it has. I Photoshopped the original green tag into a few other colors. Click on image to enjoy these free tags for for your own projects!
Thursday, September 9, 2010
Free Vintage Digital Images
I was thinking that I’m a bit overdue on sharing some free images with you...and since I found some fun vintage goodies on my latest trip to the Alameda Flea Market last Sunday, what better time than now. The tags are from a stash of watchmaker’s parts, the box front as well. I Photoshopped out the address info so you can add your own. And I’ve also tossed in some beautiful end papers from a 1918 book (red) and an old ledger (green). If you use them, I’d love to see the results!
Click on any of the images above for the larger files. And, as always, my images are free to use in your personal and commercial projects. I only ask that the images themselves shared here are never sold. Thank you.
Tuesday, September 7, 2010
Personalized Jewelry: Grandma’s Quilt
Many years ago, my sweet, late Aunt Erma, gave to me a very old and tattered quilt. She told me that it was made by my grandmother while pregnant with my father. That would have been in 1930, when my aunt was only 8, a time when women used what they had on hand to quilt with. She pointed to a few of the bright red-checked sections of one of the Dresden plate patterns and told me that was cut from her favorite out-grown dress. The quilt immediately became one of my most precious possessions.Recently, I went about photographing some of the beautiful plate design sections with plans to reproduce them into something special that I could use or display. I rigged my own camera set-up using upside-down stools, books and a modified book rack to hold my camera in the exact same place and distance from each quilt section to photograph.I decided a charm necklace would be a great idea for starters. And for a project like this, PhotoJewelryMaking.com, one of my awesome blog sponsors, has many options for photo frames or bezels to work with. But I’d been wanting to dig into my stash of vintage drapery rings ever since THIS post and thought the quilt images and the rings would be a perfect combination.I cropped the plate images to circles for cutting guides and sized them to fit the 5/8" brass rings.
I went about creating charms similar to my decal penny project that you can find instructions to HERE.Using Amazing Glaze embossing powder and my little toaster oven I was able to create the quilt charms. When working with Amazing Glaze and paper, there’s a bit of trial and error, especially when your main jewelry piece does not have a backing to catch melting resin. But Amazing Glaze is also quite forgiving and you can usually make corrections by re-heating and re-glazing the same piece. I think my charm necklace turned out pretty sweet.
I made this solitary pendant using a larger brass curtain ring with shabby paint splatters left on it to hold my favorite Dresden plate image that I cut out using my Martha Stewart 1" scalloped circle punch.
For even MORE fun ideas crafting outside the box, check out my Personalized Jewelry post over on SC Johnson!
Monday, September 6, 2010
Custom Dog Gift: Personalized Tennis Ball
Sometimes, a pet gift is less about honoring the pet and more about honoring the special pet owner. Here is a project that does both. A custom dog toy- the personalized tennis ball.
Plan A: I’d pick up some tennis balls on sale at the sporting goods store, borrow my daughter’s wood-burning set, purchase the wood-burning alphabet at the craft store using my 40% off coupon and brand a few tennis balls. FAIL. Turns out the alphabet letters only leave blobs of burnt fuzz somewhat in the shape of a letter and are best left for wood surfaces only. I chose burning over paint as I don’t know enough about the toxicity of various paints and pet health, but I figured melting the fuzz on a tennis ball would be safe enough. So, for plan B, I did the following:
Printed out the name I wanted to personalize to the ball to fit in the area and taped it over a strip of generic office-supply carbon paper. I printed in light gray in order to see the areas I’ve traced when I get to that part.
Using a ball-point pen, I filled in the lettering with as much pressure as I could without tearing through the paper to transfer the lettering.
Once transferred, I went over the lettering with the fine tip of the wood-burning tool. Be sure that you are in a safe and well-ventilated area when burning synthetic fuzz.It helps to keep the printed lettering near by for visual reference on the areas that may have not transferred well. You can use scissors or a disposable razor to remove some of the heavier fuzz in the area you plan to burn. Lightly wash and dry the ball to remove any remaining carbon residue.
You may also choose to freehand the lettering as I did for my dog’s tennis ball.
Here are some fun ideas for personalized tennis balls:
• Tuck into your dog’s mouth, if you can get him/her to stay long enough, for a fun photo op.
• Cut a long slit into the top of the ball for holding a photo of your dog. Place ball onto a wooden curtain ring or other similar stand to keep it from rolling away.
• Drop several personalized balls into a cylindrical glass container, include photos or pet mementos to create a special display.
• Wrap 3 balls in cellophane (you really only have to personalize one) and tie at the ends like a giant candy wrapper as a holiday gift. Or, cinch and tie between balls like sausage links.
• With a craft knife, score an X into the top of the ball and push a knotted loop of ribbon, string or rope into the score to create a special Christmas ornament, or to use as a marker for the leash hook. I used striped rope salvaged from a holiday gift bag handle.
Who is Gypsy? My sweet mom lives alone in an apartment in Arkansas. Her very dear friend, Don, another tenant in the complex, visits her daily. Don has a special companion, a very chubby little Dachshound, (which I would more lovingly refer to as a foot stool,) named Gypsy. Mom tells me that Don not only reads my blog, but he actually makes some of the crafts I share. Thank you Don! I’ll be sending a care package to Mom soon with the tennis ball gift for your pup included!!
Subscribe to:
Posts (Atom)